


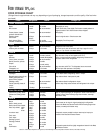

6
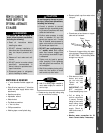
For further assistance, call 1-800-688-9900 U.S.A., 1-800-688-2002 Canada or www.maytag.com
How to connect the
wate r supply for
optional automatic
ice maker
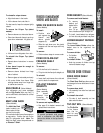
MATERIALS NEEDED
➢
1
⁄4
" outer diameter flexible copper tub-
ing
➢ Shut-off valve (requires a
1
⁄
4" hole to be
drilled into water supply before valve
attachment)
➢ Needle-nose pliers
➢ Adjustable wrench
➢ Water bucket
➢ Flat-blade screwdriver
➢
1
⁄4" hex nut driver
➢ Phillips screwdriver
➢ Masking tape or small plastic bag
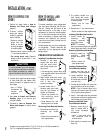
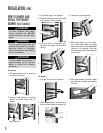
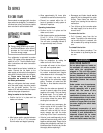
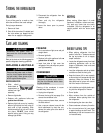
➢ Create service loop with tubing using
care to avoid kinks in tubing.
➢ Remove plastic cap from water valve
inlet port.
➢ Place brass nut and sleeve on copper
tube end as illustrated.
➢ Place end of copper tubing into water
valve inlet port. Shape tubing slightly –
DO NOT KINK – so that tubing feeds
straight into inlet port.
➢ Slide brass nut over
sleeve and screw
nut into inlet port.
Tighten nut with
wrench.
IMPORTANT: DO
NOT overtighten.
Cross threading may occur.
➢ Pull on tubing to
confirm connection
is secure. Connect
tubing to frame with
water tubing clamp
and turn on water
supply. Check for
leaks and correct, if
present.
➢ Monitor water connection for 24
hours. Correct leaks, if necessary.
NOTE
❚ Add 8' to tubing length needed to
reach water supply for creation of
service loop.
Brass
Nut Sleeve
To avoid property damage or possi-
ble injury, follow basic precautions,
including the following:
➢ Consult a plumber to connect
copper tubing to household plumb-
ing to assure compliance with local
codes and ordinances.
➢ Confirm water pressure to water
valve is between 20 and 100
pounds per square inch. If water
filter is installed, water pressure to
water valve must be a minimum of
35 pounds per square inch.
➢ DO NOT use a self-piercing, or
3
⁄16" saddle valve! Both reduce
water flow, become clogged over
time, and may cause leaks if repair
is attempted.
➢ Tighten nuts by hand to prevent
cross threading. Finish tightening
nuts with pliers and wrenches. Do
not overtighten.
➢ Wait 24 hours before placing refrig-
erator into final position to check
and correct any water leaks.
CAUTION
To reduce the risk of injury or
death, follow the basic precautions,
including the following:
➢ Read all instructions before
installing ice maker.
➢ DO NOT attempt installation if
instructions are not understood or if
they are beyond personal skill
level.
➢ Observe all local codes and ordi-
nances.
➢ DO NOT service ice maker unless
specifically recommended in
owner’s manual or published user-
repair instructions.
➢ Disconnect power to refrigerator
prior to installing ice maker.
WARNING
installation