


Flushing through
The appliance should be flushed through before being used for the first time.
• Pour water into the reservoir (2) up to the MAX mark, and close the cover (4).
• Place the coffee pot (14) on the hotplate (13) and check that the filter element (3)
and filter holder (8) are fitted (see the section entitled ‘Making espresso’).
•Place a container (e.g. a large cup) beneath the brewing head (7), to catch any
water dripping down.
• Check that the function selector for espresso brewing (f) is in the Off position (h).
• Plug in and switch on. The display (c) reads ‘12:00’.
•Press the On/Off button for coffee brewing (m) twice; the red indicator light (a)
comes on, and the word ‘Normal’ appears in the bottom left corner of the display
for several seconds. Shortly after, water will begin running into the coffee pot.
•Wait until there are several centimetres of water in the coffee pot, and then press
the On/Off button for coffee brewing again to switch off the coffee maker.
•Press the On/Off button for espresso brewing (j) twice; the green (d) and orange (e)
indicator lights come on, and the word ‘Steam’ appears in the bottom right corner
of the display for several seconds. The heating element will begin to heat up.
• When the orange indicator light goes out, turn the function selector towards the
left, to the brewing position (i). The orange indicator light will come on again, a
humming noise will be heard, and water will begin running from the brewing head.
•Once all the water in the reservoir has run through, turn the function selector to
the Off position. Press the On/Off button for espresso brewing again. The
appliance is now ready for use.
USE
The appliance can be used for making ordinary coffee, espresso or cappuccino. Once
the water has heated up, you can make several cups of espresso one after the other,
and it is possible to froth up milk for cappuccino, etc. using the steam nozzle (10).
Setting the clock
• Check that the appliance is connected to the power supply, and that none of the
indicator lights are on. The clock can only be set when the appliance is in this
mode. If the red indicator light is on, you must first press the On/Off button for
coffee brewing to switch off the coffee maker before you can set the clock. If the
green and/or orange indicator light is on, you must first press the On/Off button
for espresso brewing to switch off the espresso maker before you can set the
clock.
•Press the programming button (n) once; the word ‘Clock’ appears in the top right
corner of the display.
• Set the time using the HR and MIN buttons (k and l). This is a 24-hour clock.
Tip: If you hold the buttons down, the numbers will change more rapidly.
Setting the timer function
The appliance is equipped with a timer function, which can be used if you want coffee
brewing (ordinary coffee) to start automatically at a specific time.
• Check that the appliance is connected to the power supply, and none of the
indicator lights are on. The timer function can only be set once the clock has been
set (if not, see the section entitled ‘Setting the clock’).
•Press the programming button (n) twice; the word ‘Timer’ appears in the top left
corner of the display.
• Set the time for coffee brewing to start using the HR and MIN buttons.
•Press the On/Off button for coffee brewing once; the yellow indicator light (b)
comes on, indicating that the timer has been set.
• Check that there is a coffee filter in the filter element, coffee in the coffee filter and
water in the reservoir.
• Once the set time is reached, coffee brewing will begin. This is indicated by the
yellow light going out and the red one coming on.
Caution! The timer cannot be reset, but it can be deactivated by pressing the
On/Off button for coffee brewing. Automatic coffee brewing can only commence if
the yellow indicator light is on.
Making ordinary coffee
•Pour the required quantity of water into the reservoir (the water level must always
be between the MIN and MAX marks on the water level gauge).
• Close the water reservoir cover.
• Place a coffee filter in the filter element, and tip the required amount of coffee into
the coffee filter.
• Place the coffee pot on the hotplate and check that it is correctly positioned: The
drip stopper on the filter element should be in the centre of the hole in the lid of
the coffee pot.
•Press the On/Off button for coffee brewing twice; the red indicator light comes on.
After a short time, the coffee will begin running down into the coffee pot.
• Once the coffee is brewed, the coffee maker will switch to keep-warm function. If
the appliance is not switched off at the socket, power will cut out automatically
after 2 hours.
Caution! The drip stop function allows you to remove the coffee pot at any time
during brewing to pour a cup of coffee. However, the coffee pot must be replaced
within 30 seconds, otherwise the filter element may overflow.
Making espresso
•Pour the required quantity of water into the reservoir
(the water level must always be between the MIN and
MAX marks on the water level gauge).
• Close the water reservoir cover.
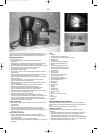
• Fit the required filter:
o If you want to brew one cup of espresso, place the
one-cup filter (r) in the filter holder.
o If you want to brew two cups of espresso, place the
two-cup filter (s) in the filter holder.
• Place coffee (ordinary filter coffee or espresso coffee)
in the filter. Use the accompanying tamper to tamp
down the coffee in the filter.
o If the coffee is tamped hard, it runs through slowly, is
stronger than normal and produces dark foam. If the coffee is not tamped down, it
runs through more quickly, is less strong and has lighter foam. Use trial and error
to find the type of coffee and how much you need to tamp it to get the result you
want.
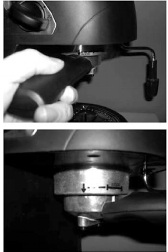
• Fit the filter holder on the brewing head:
oTake hold of the handle (o), and hold the filter holder up to the brewing head with
the handle pointing to the left, level with the arrow by the ‘Insert’ position. The
pins on the edge of the filter holder should slot into the holes in the brewing head.
oTurn the handle to the right, to the ‘Lock’ position, so the filter holder is secure.
• Check that the function selector is in the Off position.
• Place one or two cups under the filter holder.
•Press the On/Off button for the espresso maker (j); the green and orange indicator
lights will come on, and the heating element will begin to heat up. After around 3
minutes the orange indicator light will go out, indicating that the appliance is ready
for brewing.
•Turn the function selector to the brewing position. After a brief moment, espresso
runs out of the nozzles on the underside of the filter holder.
• Once the desired quantity of espresso has run through, turn the function selector
to the Off position.
• Remove the filter holder by turning it to the left and lifting it out.
• Flip the support flap (p) up against the edge of the filter, using it to keep the filter in
place while you empty out the coffee. Empty the filter, rinse it, and refill it if you
want to make more cups of espresso straight away.
o Caution! The coffee in the filter and the metal parts are extremely hot!
Frothing of milk
• Check that there is water in the reservoir.
•Press the On/Off button for the espresso maker; the green and orange indicator
lights will come on, and the heating element will begin to heat up. Once the
appliance is ready for frothing, the orange indicator light will go out.
•Pour the required amount of milk into a container.
o Caution! The milk should come straight from the refrigerator.
o Caution! The milk expands to a certain extent during the frothing process, so do
not fill the container more than half full.
•Turn the steam nozzle to a practical position, and hold the container so the end of
the nozzle is in the milk.
•Turn the function selector to the right to the frothing position (g).
• Move the cup in a circular motion, so the steam nozzle ‘stirs’ the milk. This action
whisks the milk, and a layer of froth forms on the surface of the milk.
• Once enough froth has been formed, and the milk has been heated through,
switch the steam off by turning the function selector to the Off position. Press the
On/Off button for espresso brewing to switch it off.
o Caution! Clean the tip of the steam nozzle immediately using a damp cloth, but
avoid actually touching the nozzle, as it will be very hot.
Drip tray
If you spill water, espresso or milk froth under the brewing head, it collects in the drip
tray (12). Remember to empty the drip tray when it is full. Carefully pull out the tray,
remove the grid (11) and pour out the contents. Take care not to scald yourself if the
drip tray contents are hot! The drip tray should be emptied after each use to prevent
unpleasant smells.
Caution! When you remove the drip tray, water may run out of the hole in the
appliance or drip tray down into the tray holder. Wipe this up before replacing the
drip tray.
Tips
• Heat the cups with boiling water, or place them on the cup warmer (6) before
pouring espresso into them. This will help them retain the heat better. Use small
but sturdy cups for espresso.
• Use special espresso coffee for the best espresso. This is available from most
supermarkets.
• Espresso should be drunk immediately after preparation.
•A cappuccino is made by pouring one or two cups of espresso into a large cup
and pouring hot frothy milk on top. Add sugar to taste, and sprinkle over a little
grated chocolate or cocoa powder, according to taste.
15
245039_IM 24/02/06 9:48 Side 15