


11
• For best results, remove the baking
pan and loaf within this period or
when the initial programme is
completed.
Internal light
Touch the button once, and the light
will turn on. This lets you clearly see
what is happening in the baking
process, so you can see the clever
ways the machine works and keep a
close eye on what you’re baking.
Touch the button again to turn the
light off or after 1 minute the light
will automatically turn off.
Beeper
The beeper sound:
• When pressing any button
• During the second kneading cycle
to indicate other ingredients can be
added
• When the programme finishes
• When the keep warm finishes
Baking environment
The machine can work well in a
wide range of temperatures, but
there may be a difference in loaf
size between a very warm room and
a very cold room. We recommend
the room temperature should be
between 15-34°.
WARNING DISPLAY:
1 If the display shows “H HH” after
the programme has started, the
temperature inside is still too high
and the programme has to be
stopped. Open the lid and let the
machine cool down for 10 to 20
minutes.
2 If the display shows “E E0” or “E
E1” after you have touched
START/STOP , the temperature
sensor has a fault - please contact
the Morphy Richards helpline (see
page 38).
Using your breadmaker
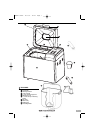
1 Take out the pan
Open the lid and remove the pan by
lifting the handle, turning anti-
clockwise and lifting out. Place on
the surface. It is important that the
pan is filled with ingredients outside
the machine so that any accidental
spillage is not ignited by the heating
elements. Attach the blade before
filling with ingredients.
2 Attach the blade
Attach the kneading blade to the
shaft by pushing on. It is
recommended to grease the
kneading blade with sunflower oil to
avoid the dough sticking to the
kneading blade, also this enables
the kneading blade to be removed
from the baked item easily.
3 Measure the ingredients
Measure the ingredients required
and add them all into the pan in the
order listed (see later section
‘Measuring your ingredients’, page
16).
When adding the yeast to the
baking pan, take care that the yeast
does not activate immediately.
TIP: Make a small indentation on
the top of flour with the finger; add
yeast into the indentation A.
• Use tepid water 21 - 28°
4 Put the pan back in
Place the baking pan back into the
breadmaker, turning clockwise to
lock into place. Close the lid gently
and plug into the power supply.
5 Turn on the switch at the back of
the breadmaker.
6 Select programme (MENU
button)
Choosing the desired setting from 1-
12.
Press the menu button until the
desired setting from 1 -12 is shown
on the LCD display. Each time the
button is touched a short beep will
sound to indicate movement from
one setting to another. Select your
desired programme.
BM48271 Rev2 18/7/07 16:32 Page 11