


12
7 Select colour
Pressing the button you can select
either LIGHT, MEDIUM or DARK
colour for the crust.
8 Select weight/loaf size
Touch this button to select the size
of the loaf (1.5lb or 2.0lb) Please
note the total operation time may
vary with the different loaf sizes.
9 Set the delay time
Use if you wish the bread to be
ready later by touching the TIME
button. A maximum of 13 hours can
be set. Check if this function is
available by looking at ‘Baking cycle
times’ on page 30. Do not use this
function with recipes that use
perishable ingredients such as
eggs, fresh milk, sour cream,
cheese or onions etc.
• Make sure you have selected a
programme from the menu, the
crust colour and the loaf size.
• Decide when you want the bread to
be ready and calculate the
difference in time between now and
then. For example, if you want a loaf
at 7am, and it is now 8.30, the day
before, the difference is 10 1/2
hours.
• Enter this time by touching the TIME
button continuously until 10.30
appears on the display. (The
increment of each touch is 10
minutes).
• Touch the STOP/START button
to activate this delay programme.
The colon (:) will flash and the LCD
will count down to show the
remaining time.
This step may be skipped if you
want the breadmaker to start
working immediately.
10 Touch the START/STOP button to
start working. The breadmaker will
automatically proceed through the
programmed stages as shown in the
‘Baking Cycle Times’ section on
page 30. The LCD will display in -
turn each part of the process to
indicate where it is in the baking
cycle i.e. KNEAD 1.
11 Adding ingredients signal for the
programme of WHOLEWHEAT,
FRENCH, SPECIALITY, SWEET,
CAKE, FASTBAKE and HOMEMADE
beeps will be heard during
operation, to prompt you and add
any ingredients. It is possible that
steam will escape through the vent
in the lid during baking. This is
normal.
12 Finish
Once the process has been
completed, one beep will be heard.
You can touch START/STOP button
for approx. 1.5 seconds to stop
the process and take out the bread.
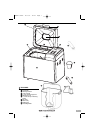
Open the lid and using oven gloves,
turn the bread pan anti-clockwise
and take out the bread pan.
CAUTION: the bread pan and bread
will be very hot! Always handle with
care.
Once you have taken out the bread
pan, let the bread cool in the pan
for 15 minutes. Use a non-stick
spatula to gently loosen the sides of
the bread from the pan.
Then turn the pan upside down and
tap the bread from the pan onto a
wire cooling rack or a clean cooking
surface until the bread falls out. Fill
the pan with warm water
immediately to prevent the blade
sticking to the shaft.
NOTE: Occasionally the kneading
blade will stay in the loaf. Wait until
the loaf is cool and then remove the
blade with a wooden or plastic
utensil to avoid damage to the non-
stick surface. The loaf is hot, so
never use the hand to remove the
kneading blade.
13 Let the bread cool for about 15-30
minutes before slicing. Use an
electric cutter or a sharp knife with
serrated blade for even slices.
14 If you are out of the room or have
not touched START/STOP button
at the end of operation, the bread
will be kept warm automatically for
1 hour, when keep warm is finished,
10 beeps will be heard.
BM48271 Rev2 18/7/07 16:32 Page 12