1312 13
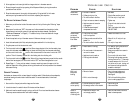
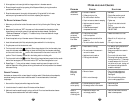
PROBLEM S AND CAUSES
PROBLEM C
AUSES SOLUTIONS
• Add water
• Grind coffee medium ground
• Fill filter only to 4 cup mark
• Tighten cap
• Plug unit into electrical outlet.
Turn on
• Refill filter basket with coffee.
DO NOT TAMP
• Rotate filter holder to full lock
• Wipe off rim; fill only to 4 cup
mark
• Fill only to 4 cup mark
• Fill reservoir with correct amount
of water. See Page 7
• Empty some water from reservoir.
See Page 8
• Turn on unit with control knob
• Following frothing stage, operate
frothing function for 1– 2 seconds
to extract excess milk. Or, turn off
unit, allow unit to cool, unplug unit
and clean out frothing tube with
a needle or toothpick.
• Pour in the required amount
of water to make cappuccino.
See Page 8
• Chill milk and frothing pitcher
prior to making cappuccino
• Use a finer grind
• Use more coffee
• Once unit has cooled, use more
water to brew espresso
Coffee does
not come out
Coffee comes
out around
the edge of the
filter holder
No steam is
generated
Milk is not
foamy after
frothing
Coffee comes
out too quickly
Coffee is
splattering out
of frothing tube
• No water in reservoir
• Coffee grind is too fine
• Too much coffee in the filter
• Cap is not secure, steam is escaping
• Appliance was not turned on
or plugged in
• Coffee has been tamped /
compressed too much
• Filter holder not rotated
to full lock position
• Coffee grounds around the filter
basket rim
• Too much coffee in the filter basket
• Water reservoir is empty
• Too much water in the reservoir –
no room for steam
• Appliance is not turned on
• Frothing tube is blocked
• Ran out of steam
• Milk is not cold enough
• Ground coffee is too coarse
• Not enough coffee in filter basket
• Water tank is empty or low,
not enough pressure
12
3. Allow appliance to sit overnight with the vinegar solution in the water reservoir.
4. Discard vinegar through the top opening of the Espresso Maker by turning the machine
upside down over the sink.
5. Rinse the water reservoir thoroughly with tap water by filling tank half full with water
and then pouring the water back out into the sink, repeating this step twice.
TO D
ELIME INTERNAL PARTS:
1. Make sure you delime the inside of the water reservoir first by following the “Deliming” steps
above.
2. Make sure all controls are “OFF,” the power cord is disconnected from the electrical outlet,
the appliance is cool and all pressure in the appliance has been released.
(See Section
“CAUTION:P
RESSURE”
on Page 6).
Fill carafe to the top of the metal band with vinegar
and pour into reservoir.
3. Screw the cap back on top of the water reservoir. Make sure the cap is on tight.
4. Insert the brew basket (with filter) and place the glass carafe with lid on the drip tray.
5. Plug the power cord into the electrical outlet.
6. Turn the control knob to the position. When vinegar begins to flow into the carafe, place
a cup with cold water under the frothing aid. Insert the frothing tube into the water and slowly
turn the control knob to the position. After ten seconds turn the control knob to the “OFF”
position. This will clean any residue left in the frothing tube from frothing milk.
7. Turn the control knob to the position. When all the vinegar has been pumped into the carafe
and the flow has stopped, turn the control knob to “OFF” and allow the appliance to cool.
8. Repeat Steps 1 – 7 using only tap water to rinse any remaining traces of vinegar out of the
machine. Repeat this rinsing process, allowing the machine to cool and pressure to be released
before each rinsing.
CARAFE CLEANING
Hard water can leave a whitish mineral deposit inside the carafe. Coffee discolors these deposits,
sometimes leaving a brownish stain inside the carafe. To remove these stains, follow these
simple steps:
1. Use a solution of equal parts white vinegar and hot water.
2. Let solution stand in carafe for about 20 minutes and then discard.
3. Wash and rinse the carafe thoroughly using a soft cloth. Do not use harsh abrasive cleaners.
These may cause scratches which can lead to breakage.


