


76
HOW TO PREPARE QUALITYESPRESSO AND CAPPUC CINO ATHOME
THE
COFFEE
The coffee should be freshly ground, dark roasted variety. You may want to try a French or
Italian roast. Pre-ground coffee will only retain its flavor for 7 – 8 days, provided it is stored
in an air-tight container, in a cool, dark area. Do not store in a refrigerator or freezer.
Whole beans are recommended, to be ground just before use. Coffee beans stored in an air-tight
container will keep up to 4 weeks before they begin to lose their flavor.
THE G
RIND
This is a vital step in the espresso making process and takes practice. The coffee must be of
a fine grind.
• The correct grind should look like salt.
• If the grind is too fine, the water will not flow through the coffee even under pressure.
This grind looks like powder and feels like flour when rubbed between fingers.
• If the grind is too coarse, the water flows through the coffee too fast, preventing
a full-flavored extraction.
Be sure to use a quality grinder or Burr Mill for uniform consistency in your espresso grind.
Oval shaped coffee grinders are not recommended because the grind is not consistent.
We recommend using a MR. COFFEE
®
Burr Mill. The burr method of grinding ensures
a more precise, even grind.
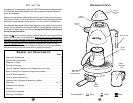
BEFORE BREWING YOUR FIRST CARAFE OF ESPRESSO
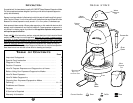
Please refer to Page 5 for Diagram of Parts.
1. Turn the control knob to the “OFF” position and make sure that the appliance is unplugged
from the electrical outlet.
2. First remove and then wash the carafe, lid, filter and brew basket in a mixture of mild detergent
and water. Rinse each thoroughly and replace into the machine. See “How to Brew Espresso”
below for instructions on removal and replacement of filter and brew basket.
3. To clean the inside of the machine, follow steps for “How to Brew Espresso” below,
using water only. Do not immerse the appliance in water or attempt to reach any
internal parts of the machine.
HOW TO BREW ESPRESSO
1. Turn the control knob to the “OFF” position.
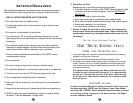
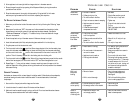
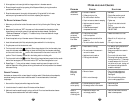
2. Fill the glass carafe with cold water to the designated marking for the desired number of
servings of espresso or cappuccino. Never use warm or hot water to fill the water reservoir.
The following chart describes how much water to use for the desired amount of servings.
N
OTE
: One serving or shot of espresso equals 2 ounces.
6
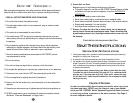
CAUTION
: PRESSURE
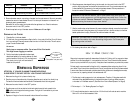
In order to check if the appliance is under pressure, follow these steps:
1. Turn the control knob to the “OFF” position and unplug the appliance.
2. Rotate the control knob to the position. If steam comes out
of the frothing tube, then the water reservoir is still under pressure.
Turn the control knob to the “OFF” position.
3. To release the pressure, hold a pitcher with water under the frothing
tube and immerse the frothing aid in the water.
S
LOWLY
T
URN THE
C
ONTROL
K
NOB TO THE
“STEAM” P
OSITION AND
R
ELEASE THE
S
TEAM
.
4. When the frothing tube stops releasing steam, turn to the
“OFF” position and slowly remove the cap.
5. Do not remove the brew basket at any time during the brewing
process or until pressure is relieved.
6. Use caution when removing the brew basket. The metal parts
may still be very hot. Also, there may be hot water floating
on the top of the filter.
7. If coffee does not drip from basket, the brew basket is blocked.
Allow the appliance to cool down, then release the steam with the
instructions above. The blockage may be caused by too finely ground
coffee. See
“P
ROBLEMS AND
C
AUSES
”
on Page 13.
8.
W
HEN
C
LEANING THE
F
ROTHING
A
ID
:
Place a frothing pitcher or large
cup (with at least an 11 ounce capacity) half full of water under the
frothing aid. Make sure the tip of the frothing tube is submerged
in liquid before turning the control knob to the “STEAM” position.
Froth the water for approximately 15 seconds.
In order for your unit to work properly time after time,
clean the frother after each use.