


www.oster.com
12
www.oster.com
13
Things You May Need to Buy
• You should only use “Bread Machine” fl our for the EXPRESS BAKE Breadmaker setting recipes.
• You may need a cooking thermometer to measure the temperature of the water
you use in these recipes. You should only use hot water (between 115° and 125° F)
for EXPRESS BAKE Breadmaker setting recipes.
Although baking EXPRESS BAKE Breadmaker setting breads is a little diff erent, the results
and convenience are well worth it.
The following recipe is a great one to try for your fi rst EXPRESS BAKE Breadmaker setting loaf.
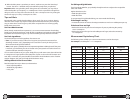
Traditional White Bread 1–1/2 lb. loaf
Ingredients:
1 cup + 2 tablespoons
9 ounces total) of hot water (115° – 125°)
2 tablespoons oil
(room temperature)
Instructions:
1 Carefully measure 1 cup and 2 tablespoons (9 ounces total) of hot water. Remember,
it’s a good idea to view the measuring cup at eye level to make sure you have measured
exactly 1 cup and 2 tablespoons (9 ounces total).
2 Use a cooking thermometer to make sure the temperature of the water is between
115° – 125° F. When water is at the proper temperature, pour into the bread pan.
3 Carefully measure and add 2 tablespoons oil that is at room temperature.
4 Carefully measure and add the salt and sugar to the bread pan.
5 Measure and add exactly 3 cups of bread fl our to the bread pan. Remember to make sure
not to “overpack” the fl our into the cup. To avoid over packing, a good trick is to fi ll the
measuring cup to overfl owing, then tap the side of the cup with a knife or spatula to
remove air pockets. Level off the measuring cup with the knife or spatula.
6 Before adding the yeast, use your fi nger to form a well (hole) in the fl our where you will
pour the yeast. Yeast must NEVER come into contact with a liquid when you are adding
ingredients. Measure (again, leveling off ) 5 teaspoons of a fast-rising yeast and carefully
pour it into the well you made in the fl our.
7 Carefully snap the baking pan into the breadmaker.
8 Close the lid of the bread machine and plug the power cord into the wall outlet. The
following things will happen. The machine will “beep,” and the lights of the display will
turn on. The time setting will say “3:25” hours.
9 Repeatedly press the “Menu Select” button to select the EXPRESS BAKE Breadmaker
(1.5LB) setting.
10 Press the “Start/Stop” button and your machine will start making bread. You will hear
the breadmaker begin to mix the ingredients.
Note: It is important that you DO NOT press the “Start/Stop” button while the breadmaker
is making bread. If you do, the machine will turn off and you will need to start over again,
from scratch.
2 tablespoons sugar
1 teaspoon salt
3 cups Bread Machine fl our
5 teaspoons fast-rising yeast
Note: DO NOT raise the lid when using the EXPRESS BAKE Breadmaker setting.
Doing so can aff ect the rising of the dough.
Caution: The breadmaker is very hot DO NOT handle the machine while it’s operating.
After the EXPRESS BAKE Breadmaker setting bread is baked
Caution: Do not put your face near the lid when you open the breadmaker, Hot steam may
escape that could burn you.
Important: The breadmaker has an automatic “keep warm” setting that will keep your
bread warm for up to one hour, We recommend however to remove the bread from the
breadmaker right away to preserve its freshness.
1 Use pot holders or oven mitts to carefully lift the pan by its handle from the breadmaker.
2 Turn the pan upside down onto a cooling rack and gently shake it until the bread comes
out. If it sticks, take a rubber spatula (metal can damage the pan’s surface) and carefully
go around the sides of the loaf until the bread comes out.
3 If the kneading blade comes out with the bread, use the included kneading blade
removal tool to remove it from the loaf, Remember, it will be hot!
Allow the bread to cool for 15 minutes before slicing and enjoying it.
Important: If you wish to make another loaf of bread right away, please allow the
breadmaker to cool down for 10 to 15 minutes with the cover open and the pan removed.
Using the Delay Timer
You can delay the time your bread maker starts to have fresh bread
ready when you get up in the morning or when you come from work.
We recommend that before you use the Delay Timer, you try out a few
recipes. Use recipes that have produced good results for you in the
past.
Important: You CANNOT use the Delay Timer for EXPRESS BAKE Breadmaker settings.
Before using the Delay Timer:
1 Add all of the ingredients of the recipe.
2 Select the correct setting for the kind of bread you are making (French, Sweet, etc.).
3 Select the crust color.
Caution: Do not use recipes with ingredients that can spoil like eggs or milk.
To Use the Delay Timer:
1 Figure out how many hours and minutes there are between now and when you want
fi nal, baked bread. For example, if it is 8:00 AM and you want bread ready for dinner at
6:00 PM, that is 10 hours.
2 Use the delay timer up button to advance the time in 10 minute increments. In our
example, you will do this until the timer reads “10:00.” If necessary, use the delay timer
down button to decrease the time. (To advance the time quickly, simply press and hold
down the delay timer up/down buttons.)
Important: If you make a mistake or wish to start over, press and hold down the “Start/
Stop” button until you hear a beep, then press the “Start/Stop” button one more time. The
display will show the original setting and cycle time. The delay timer is canceled and you
can start again.