


24
ADJUSTMENTS - COFFEE BREWING
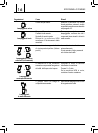
5.2 Coffee Grinder Adjustment
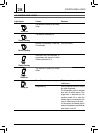
Warning! The grinder adjustment knob, inside
the coffee bean hopper, must be turned only
when the grinder is working. Do not pour ground and/
or instant coffee into the coffee bean hopper.
Do not insert any material other than coffee
beans into the hopper. The grinder contains
moving parts that may be dangerous. Therefore, do
not insert fi ngers and/or other objects. Turn off the
machine by pressing the ON/OFF button and remove
the plug from the socket before carrying out any
type of operation inside the coffee bean hopper.
Do not pour coffee beans when the coffee grinder
is working.
The machine lets you make slight adjustments to the
coffee grinder to adapt it to the kind of coffee used.
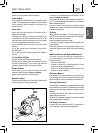
To make any adjustment, use the pin inside the coffee
bean hopper; this must be pressed and turned using
only the grinder adjustment key provided.
(Fig. 27) - Press and turn the pin one notch at a time.
You must brew 2-3 coffees before you will taste a
difference.
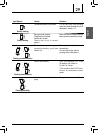
(Fig. 28) - The reference marks inside the coffee bean
hopper indicate the grind setting; there are 5 different
grind settings to choose from with the following
references:
1 - Coarse Grind
2 - Fine Grind
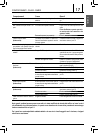
5.3 Adjusting the Amount of Coffee Brewed
The machine allows you to adjust the amount of brewed
coffee according to your tastes and/or the size of your
cups.
Each time you press and release a coffee button, the
machine brews a pre-programmed amount of coffee.
This amount may be reprogrammed to your taste. Each
button may be individually programmed for a specifi c
brew setting.
As an example, the following procedure describes the
programming of the small coffee button (14), which is
normally associated with espresso coffee.
• (Fig. 10A) - Place a cup beneath the dispensing
head.
• (Fig. 12) - Press and hold down the small coffee
button; the large coffee button blinks during this
phase.
• (Fig. 12) - Release the small coffee button when
the amount of coffee in the cup reaches the desired
level.
At this point the small coffee button is programmed;
each time it is pressed and released, the machine
will brew the same amount of coffee that was just
programmed.
5.4 Stand-By
The machine is designed for energy saving.
After 60 minutes of inactivity, the machines turns off
automatically.
To turn the machine on again, simply press the ON/OFF
button (16); in this case the machine will go through the
rinse cycle only if the boiler is cold.
5.5 Large Cups
Most cups on the market can be used with this coffee
machine.
If you would like to use an exceptionally large cup,
remove the grill (6).
Make sure that the drip tray (8) is clean and
empty before removing the grill and position-
ing the cup (see section 9).
(Fig. 11) - Remove the grill (6) and place the cup in the
special support.
Replace the grill (6) when fi nished.
6 COFFEE BREWING
Note: Should the machine not brew coffee,
make sure that the water tank (9) contains
water.
Before brewing coffee, make sure that the
green temperature light (19) is steady on and
that the water tank and the coffee hopper are full.
Keep the control dial (17) in the " " position,
during the coffee brewing cycle.
• (Fig. 10 - Fig. 11) - Place 1 or 2 cups under the
dispensing spout (5).
• (Fig. 12) - To brew coffee, press and release:
the small coffee button for an espresso coffee;
the large coffee button for a long coffee.