


22
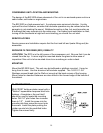
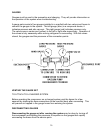
NEW SYSTEM CHARGING
INTRODUCING INITIAL CHARGE
After the evacuation leak test and pump down, shut off the manifold valves, disconnect
the center hose from the pump and connect it to a cylinder of refrigerant Vent the hose
from cylinder (refrigerant supply) to the manifold. With the refrigerant can in the
inverted (liquid) position, open the discharge side valve (high side) valve and weigh in
about 6 oz of refrigerant. This should provide a saturated vapor producing a pressure
matching the pressure temperature chart. Close the valve and begin an inspection of all
the connections in the system. Begin leak checking the entire system.
LEAK CHECKING
Leak checking is a very important step, which should be done with diligence. A leak will
cripple this system. Please take the time needed to be sure all connections are tight.
Check every connection even the ones that were pre-made in manufacture.
The evacuation leak test is a preliminary check and is not to be considered a system
leak check.
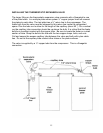
LEAK CHECKING A CHARGED SYSTEM
ABOUT PRESSURES
Refrigerant in a saturated condition, i.e. part liquid and part vapor, will exert a pressure
that is a function of its temperature. The higher the temperature, the higher the
pressure. Avoid leak checking in cold weather or on a cold system.
A refrigerant leak will show with moderate pressure. (A leak is not a function of
pressure. Pressure is only required to aid in detection).
There are two ways to leak-check a pressurized system:
1. Soap bubbles (a solution of dish soap and water works well).
2. An HFC electronic leak detector probe, which senses the presence of refrigerant
molecules.