27
TROUBLESHOOTING
The most common problems that can occur in a SEA FROST BG 2000 System are:
(1) Overcharge or loss of water flow switching off the manual reset high-pressure
switch.
(2) Loss of refrigerant charge resulting from leaks.
(3) Moisture or dirt plugging the expansion valve.
(4) Compressor damage due to loss of refrigerant charge.
STEP 1. Gather information as to the nature of the problem before operating the
system. A leak often leaves a trace of oil. Inspect the fittings and tubing for wear,
corrosion, and chafe. Do not operate the compressor until the trouble is corrected.
HIGH PRESSURE CUTOUT/MANUAL RESET BUTTON
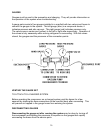
The compressor is fitted with a MANUAL RESET high-pressure switch. The switch is
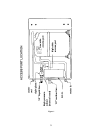
located on the left end of the BG 2000 unit. (See drawing). This switch will disconnect
the thermostat circuit switching off the compressor and water pump. Pushing the red
rubber button after the unit has rested for a few minutes will reset the switch. A
faint click will be heard when the button resets.
BEFORE RESETTING the switch inspect the pump and strainer. If the installation
location of the through hull allows air to enter the system it may be necessary to bleed
the air from a hose connection after the pump but below the waterline by loosening a
hose connection. When water flows from the connection retighten the connection.
*This switch will disconnect if the water flow stops.
*This switch will disconnect if the system is overcharged.
Overcharge may not appear until the boat moves into warmer water than it has been
commissioned in. Discharge the system until the unit operates without activating the
high-pressure switch. Be sure that the sight glass still runs clear.
For further troubleshooting, attach purged gauges at the compressor.
a) If the refrigerator box and SEA FROST plates are warm and pressure readings
are below 100psi with compressor off (in 50 degree F or higher ambient conditions),
pressurize system with R-404a and leak-check. After leaks have been located,
repaired, and tested, install a new RFD (Receiver/filter/drier) - see instructions below in
Step 3.


