


packing and Door Handtle Removal
CAUTION
To Avoid The Risk Of Personal
Injury, Use Caution In Unpacking,
Handling, Removing, Installing
and Cleaning All Parts Of Product
Which May Have Sharp Edges.
ACAUTION
To Avoid The Risk Of Personal
Injury, Wear Protective Hand
Covering.
Remove all tape and packing material
To remove tape residue, touch a portion
of the tape to the residue and lift it off If
adhesive residue still remains, try clean-
ing the sticky area with a clean cloth
soaked in mild dish washing soap. Wipe
area clean_
if the wood base is still attached, have
snmeone help youtiltthe unit onto its
k, placing a sturdy support under-
._th.Remove the mounting bolts from
the base and discardbolts and wood
base,
IMPORTANT! Do not leave the cabinet
on itsback longer than ittakesto
remove the wooden base and do not
connect the power cord until after all the
inside packing has been removed and
the cabinet has been leveled for proper
operation.
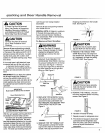
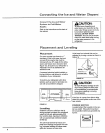
IMPORTANTI
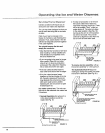
Must Install the Defrost Pan As Shown
SoundReducing Cone
Locating
Stops
Grille
Defrost
n Pan
Located Bottom Right Side.
With the unit upright, pull the grille from
the bottom front and make sure the
' "frost drain pan is located underneath
defrost water drain tube. Two drain
'_'pan side supports (attached to the cabF
net bottom) keep the pan inthe proper
location, to make the automatic defrost
drain water drop on the sound reducing
cone. The drain pan locating stops pre-
vent the pan from being installed
backwards.
Remove all tape and packing material
from insidethe unit
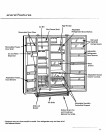
SPECIAL NOTE: If Cabinet is unable to
fit through doorway safely, you may
have to remove the door handles or
door assemblies Refer to the following
chart and diagrams.
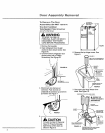
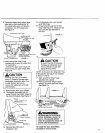
To Remove Door Handles
WARNING
To Avoid The Risk Of Personal
Injury, Property Damage Or Death
unplug the refrigerator before
attempting to remove the door
handle&
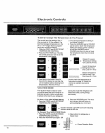
REMOVE THE FREEZER TOP
DOOR EDGE TRIM PIECE. Remove
the screws holding the trim to the top
of the door. See Rgure 1, Remove
the top door edge trim by sliding the
top door edge trim to the right and
lifting up. See Figure 2
Trim
I
Face Trim
FIGURE1
FIGURE 2
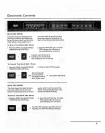
2oREPLACE TWO SCREWS. Tempo-
rarily replace two screws to hold the
second trim strip underneath. DO
NOT REMOVE THE SECOND TRIM
STRIP FROM THE DOOR_See
Figure 3o
FIGURE 3
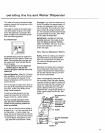
3. REMOVE THE TOP HANDLE CAR
Push upward to unsnap the handle
cap fromthe track inthe base of the
handte. Hold cap to prevent it from
dropping once free from the handle
track° See Hgure 4.
FIGURE 4 __"
, CAUTION
To avoid the risk of property dam-
age DO NOT kink the trim strips.
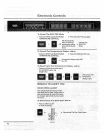
REMOVE THE HANDLE TRIM
STRIR Remove the trim strip from
the handle track. Bend the strip gen-
tly if necessary, to clear the ceiling.
DO NOT KINK. See Figure 5.
FIGURE 5 i _/
ACAUTION
To Avoid Personal Injury, securely
hold onto the door handles while
removing screws.
5 REMOVE THE HANDLE, Unscrew
the seven exposed handle mounting
screws See Rgure 6.
FIGURE 6
6. Handles wilteasily fall away
7. Repeat process for refrigerator door.
8oThe electronic keypad is electrically
connected to the refrigerator door
face trim piece. Use care in handling
so as not to pull the electrical
connection