


M
ARATHONER
G
OLD
& S
ILVER
S
TAR
G
AS
C
ONVECTION
O
VENS
O
PERATION
O
PERATOR
’
S
M
ANUAL
1181887
REV
1P
AGE
33
OPERATION
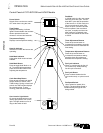
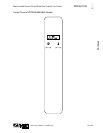
Operation of RACK TIMER Models
Rack Timer models have five independent timers, one for each rack. After loading a rack, you can start a
timer for that rack. The control panel displays which racks are being timed, which rack will be the next to
time out, and how much time remains before that happens. Of course, the oven temperature, fan speed,
and fan mode are the same for all racks.
You can manually set a cooking time each time you load a rack, or you can preset up to five time durations
that you can then recall by pressing the corresponding Timer Button. To assign a time duration to a Timer
Button, hold down the corresponding button (TIMER1, TIMER2, TIMER3, TIMER4, or TIMER5), turn the
Time Knob to the desired time, and release the Timer Button. Step 6 below describes how to use these
buttons to set a rack’s timer.
The rack timers are reminders to you of when to remove pans from the oven. The rack timers do NOT
control the temperature of the oven.
To cook using the rack timers, do the following:
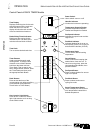
1. Turn the oven ON using the Power Switch at the top of the control panel.
2. Set the cooking temperature by turning the Temperature Knob. The setting appears in the top right
corner of the control panel display. The displayed temperature will flash while the oven preheats.
3. Select the desired fan speed by pressing the Fan High/Low Button. The setting (HiFAN or LoFAN)
appears in the control panel display just below the temperature setting. The appropriate fan speed
depends on the type of food being cooked.
4. Select the desired fan mode by pressing the Fan Cont/Cyc Button. The setting appears in the control
panel display just below the fan speed setting. In continuous mode (CONT), the fan will run when the
oven is ON and the doors are closed. In cycle mode, the fan will run only when the doors are closed
and the burners are operating.
5. Wait until the oven has reached cooking temperature (when it does, the temperature display will stop
flashing and the oven will “beep” once). To display the actual temperature in the oven at any time,
press the Actual Temp button.
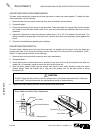
6. Open the oven doors and insert a pan onto a rack. Close the doors and then either turn the Timer Knob
until the desired cooking time appears on the control panel display, OR press the Timer Button that
corresponds to a preset time that you have associated with that button. Finally, start the timer by
pressing the Rack Button that corresponds to the just-loaded rack.
The time display will start to count down. The time display indicates the time remaining until the next
time-out of a rack timer will occur. To display the time remaining for any rack, press the corresponding
Rack Selector button. You can add additional pans at any time. The timer for each rack works
independently.
The bottom line of the control panel display indicates which racks are presently being timed (RACK1,
RACK2, RACK3, RACK4, and/or RACK5). The one that is flashing indicates which rack is the next one
that will time out.
If you open the oven doors, all rack timers pause until the oven doors are closed again.
To turn on the oven interior light, press and hold the switch located at the bottom of the control panel.
To cancel any rack’s timer (if, for example, you see that the food on that rack has finished cooking),
press the corresponding Rack Button, then press the Cancel button.
7. When a rack’s timer runs out, the time display will change to display a number corresponding to the
rack that is done, and the control panel will “beep” repeatedly. Press the Cancel Button. If the oven
continues to beep and the display shows another rack number, it means that rack’s timer has also
timed out. Press the Cancel Button until the oven stops beeping, noting which racks have timed out.
Open the oven doors and remove the pan(s) from the timed-out rack(s). If you have more pans to be
cooked, put them on the now empty rack(s) and set the rack’s timer as appropriate (see Step 6).