


M
ARATHONER
G
OLD
& S
ILVER
S
TAR
G
AS
C
ONVECTION
O
VENS
A
DJUSTMENTS
O
PERATOR
’
S
M
ANUAL
1181887
REV
1P
AGE
39
ADJUSTMENTS
A
DJUSTMENTS
!
WARNING
ADJUSTMENTS AND SERVICE WORK MAY BE PERFORMED ONLY BY A QUALIFIED
TECHNICIAN WHO IS EXPERIENCED IN, AND KNOWLEDGEABLE WITH, THE OPERATION OF
COMMERCIAL COOKING EQUIPMENT. HOWEVER, TO ASSURE YOUR CONFIDENCE,
CONTACT YOUR AUTHORIZED SERVICE AGENCY FOR RELIABLE SERVICE, DEPENDABLE
ADVICE OR OTHER ASSISTANCE, AND FOR GENUINE FACTORY PARTS.
NOTICE
Warranty will be void and the manufacturer is relieved of all liability if service work is performed by
other than a qualified technician, or if other than genuine Southbend replacement parts are installed.
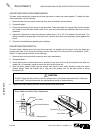
LUBRICATION
The door chains and sprockets have been lubricated at the factory with high temperature “Never Seeze”
lubricant. After each six months of usage, lubricate the door chains and sprockets with the same type of
lubricant.
Motor lubrication information can be found on permanent label located on motor.
Casters are provided with a Zerk fitting for proper lubrication when required.
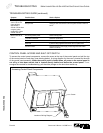
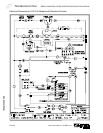
ADJUSTING GAS PRESSURE REGULATOR
The pressure regulator is factory set at 4.5" W.C. for natural gas and 11" W.C. for propane gas. To check
the manifold pressure:
1. Turn all thermostats and burner valves to “OFF” position.
2. Turn main gas valve to entire unit off.
3. Remove valve panels and locate 1/8" plug in manifold.
4. Remove plug and install a fitting appropriate to connect a manometer.
5. Turn on main gas to unit and light pilots.
6. Turn all burners and ovens to full “ON” position and read manometer.
7. If manometer does not read 4.5" W.C. for natural gas, or 11" W.C. for propane gas, adjust regulator (if
gas pressure is O.K. go to Step 10).
8. Remove cap from top of regulator.
9. With a screwdriver rotate regulator adjustment screw clockwise to increase, or counterclockwise to
decrease, pressure until manometer shows correct reading.
10. Repeat steps 1 and 2.
11. Remove manometer fitting and replace plug in manifold.
12. Repeat step 5.
13. Replace valve panels.