


INSTALLATION STRATOSTEAM COUNTERTOP STEAMER
PAGE 14 OF 44 OWNER’S MANUAL 1185184
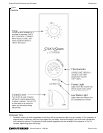
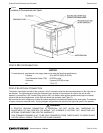
STEP 2A: ATTACH LEGS AND BRACKETS
A set of four legs is packed with steamers ordered with legs.
A threaded hole is located at each corner. Each leg has a corresponding mating thread. The legs can be adjusted to
overcome a slightly uneven surface.
1. Raise the steamer sufficiently to allow the legs to be attached. For safety, “shore up” and support the steamer
with an adequate blocking arrangement strong enough to support the load.
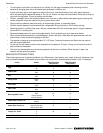
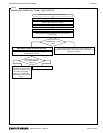
2. Screw the legs into the holes (see Figure 5). Note that the front legs are different than the rear legs.
3. Lower the steamer gently onto a level surface. Never drop or allow the steamer to fall.
4. Make sure that the steamer is level (both side-to-side and front-to-back). If necessary, adjust the height of each
leg by turning the foot-pad of the leg.
5. Go on to Installation Step 3.
Figure 5
Attach Legs and Brackets
STEP 2B: MOUNTING ON CABINET BASE
If the steamer is to be mounted on the optional cabinet base, first attached the legs to the cabinet base (if not already
attached). Then place the steamer on top of the cabinet base and line up the threaded holes on the bottom of the
steamer with the holes in the cabinet-base top. Secure the steamer to the base with four 3/8-16 bolts. Go on to
Installation Step 3.
STEP 2C: STACKING TWO STEAMERS
If two steamers are to be stacked, mount the lower steamer first on either legs (Step 2a) or the optional cabinet base
(Step 2b). Remove (if present) the four chrome-plated plugs from the holes in the top panel of the lower steamer.
Place the upper steamer on top of the lower steamer and line up the threaded holes on the bottom of the upper
steamer with the holes in the top of the lower steamer. Secure the upper steamer to the lower steamer with four 3/8-
16 bolts. The remaining steps of the installation must be performed for both steamers (they do not share any
connections internally).