


SERVICE STRATOSTEAM COUNTERTOP STEAMER
PAGE 18 OF 44 OWNER’S MANUAL 1185184
SERVICE
WARNING
ADJUSTMENTS AND SERVICE WORK MAY BE PERFORMED ONLY BY A QUALIFIED TECHNICIAN WHO IS
EXPERIENCED IN, AND KNOWLEDGEABLE WITH, THE OPERATION OF COMMERCIAL COOKING
EQUIPMENT. TO ASSURE YOUR CONFIDENCE, CONTACT YOUR AUTHORIZED SERVICE AGENCY FOR
RELIABLE SERVICE, DEPENDABLE ADVICE OR OTHER ASSISTANCE, AND FOR GENUINE FACTORY
PARTS.
NOTICE
INSTALLATION OF OTHER THAN GENUINE SOUTHBEND PARTS WILL VOID THE WARRANTY ON THIS
EQUIPMENT.
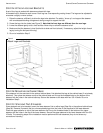
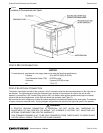
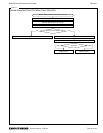
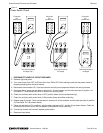
A serial plate is located on the right side of the steamer, near the top right corner. A second serial plate is located on
the rear of the steamer near the top left corner (see Figure 1).
Replacement parts (including parts not listed in this manual) may be ordered either through a Southbend Authorized
Parts Distributor or a Southbend Authorized Service Agency.
When ordering parts, please supply the Model Number, Serial Number, Part Number, and Part Description.
This section contains troubleshooting flowcharts, procedures, and electric schematics to assist a qualified service
technician in the servicing of a StratoSteam countertop steamer.
A description of how the steamer operates appears on the next page.
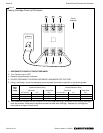
To remove a side panel (for access to the interior), remove the securing screw near the center of the bottom edge of
the panel. To remove the top panel, remove the two securing screws on the rear face, then slide the top panel forward
and off.
The door is field-reversible (contact Southbend for instructions).
TROUBLESHOOTING FLOWCHARTS, PROCEDURES, AND WIRING DIAGRAMS
Find the symptom below that corresponds to the malfunction, then turn to the corresponding page. Follow the
flowchart on that page until the problem is solved.
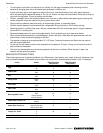
Troubleshooting Flowchart, Procedure, or Wiring Diagram Page
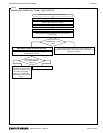
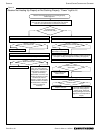
Troubleshooting Flowchart: Steamer Not Heating Up, “Power” Light Is Not Lit 21
Troubleshooting Flowchart: Steamer Not Heating Up Properly or Not Cooking Properly, “Power” Light is Lit 22
Troubleshooting Flowchart: Buzzer Does Not Come On When Timer Runs Out 23
Troubleshooting Procedure: Heating Cartridge Check (at Contactor) 24
Troubleshooting Procedure: Power Switch Check 25
Troubleshooting Procedure: Contactor Check 26
Troubleshooting Procedure: Timer and Buzzer Check 27
Troubleshooting Procedure: Door Switch Check 28
Troubleshooting Procedure: High Limit Thermostats Check 29
Troubleshooting Procedure: Water-Level-Control Sensor Check 30
Troubleshooting Procedure: Water Solenoid Check 31
Wiring Diagram for 208/220/240 Volt Models 32