


12
S
TEP
-
BY
-S
TEP
D
IRECTIONS ON
H
OW TO
U
SE
Y
OUR
B
READ
M
AKER
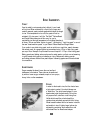
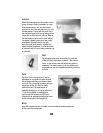
1. OPEN THE LID AND REMOVE THE BAKING PAN by pulling straight up on
the handle. It is important to remove the Baking Pan from the unit before putting the
ingredients into the pan to avoid accidentally spilling ingredients into the inner case.
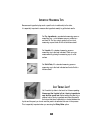
2. ATTACH THE KNEADING BLADE onto the shaft inside the Baking Pan by lining
up the flat side of the blade with the flat side on the shaft. Make sure the Kneading Blade
is placed securely on the shaft.
3. MEASURE ALL INGREDIENTS carefully and accurately. Inaccurate
measurements,
even if only slightly off, can make a difference in results. Add ingredients
into the bread pan in the order they are listed. Yeast is always added last and must not
come in contact with any liquid. (Before adding yeast, remember to dig a small hole in
the flour so that the yeast doesn’t prematurely come into contact with the liquids or salt.
This is especially important when you are using the Delay Bake Timer).
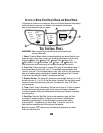
4. WIPE WATER AND OTHER SPILLS from the outside of the pan;
then insert the pan firmly into the bottom of the machine, applying pressure to
each corner of the pan to make sure it is snapped tightly into the retaining brackets.
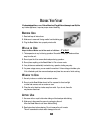
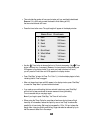
5. CLOSE THE LID AND PLUG IN THE BREAD MAKER. You will hear a beep
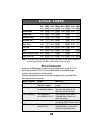
and the LED display window will show “1P” for “Basic” setting, “Medium” crust.
6. CHOOSE YOUR BREAD TYPE. Select the appropriate setting for your recipe
by pressing the “SELECT” button on the control panel. Each time “SELECT” is pressed
the number in the display window will advance to the next setting.
7. SELECT CRUST COLOR. Your bread maker will automatically produce
a “medium” crust color (“P”= the default program) unless another is chosen;
select crust color by pressing the “Crust Color” button; “L” = low setting (light crust);
and “H” = high setting (dark crust).
8. PRESS THE “START/STOP” BUTTON firmly once you have selected your
bread type and crust color. A signal tone will sound to indicate that you have begun!
The baking time in hours and minutes will appear in the display. It will count down the
remaining bake time in one-minute increments until the bread is done. This bread maker
has a convenient Viewing Window so that you may watch the progress of the bread as it
is mixed, kneaded, and baked. DO NOT OPEN THE LID DURING THE BAKING CYCLES.
NOTE: Once the “Start/Stop” button is pressed, the selected function(s) cannot be altered.
To make any changes at this point, the unit must be stopped, reset and restarted.
To stop, press the “Start/Stop” button and hold until signal sounds and screen
reverts to initial display setting.