


21
Model 220 Operating Procedures
080911
Step 3
Put the control switch into the “EJECT” position and
allow the water to agitate for approximately one
minute.
Step 4
Put the control switch into the “OFF” position. Hold a
mix pail beneath the ejection port.
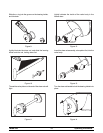
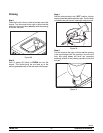
Step 5
T urn the draw rod handle and pull toward, opening the
ejection port. When the water stops flowing from the
ejection port, push the draw rod back into the valve
body and lock into place.
Repeat these procedures until the rinse water being
drawn from the freezing cylinder is clear.
Cleaning/Sanitizing
Step 1
Prepare a pail of approved 100 PPM cleaning/sanitiz-
ing solution (examples: 2--1/2 gal. [9.5 liters] of
Kay--5R or 2 gal. [7.6 liters] of Stera--S heenR). USE
W ARM WATER AND FOLLOW THE MANUFACTUR-
ER’S SPECIFICATIONS.
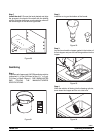
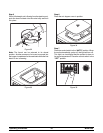
Step 2
Pour the cleaning/sanitizing solution into the hopper
and allow it to flow into the freezing cylinder.
Step 3
While the solution is flowing into the freezing cylinder,
brush clean the hopper and the mix inlet hole.
Step 4
Put the control switch into the “EJECT” position. This
will cause the cleaning/sanitizing solution in the
freezing cylinder to be agitated. Allow it to agitate for
five minutes.
Step 5
Put the control switch into the “OFF” position. Hold an
empty mix pail beneath the ejection port.
Step 6
T urn the draw rod handle and pull forward, opening the
ejection port. Draw off a ll the sanitizing solution. When
the sanitizer stops flowing from the ejection port, push
the draw rod back into the valve body and lock into
place.
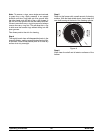
Disassembly
MAKE SURE THE CONTROL SWITCH IS
IN THE “OFF” POSITION. Failure t o follow this
instruction may result in severe personal injury from
hazardous moving parts.
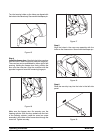
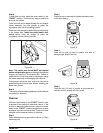
Step 1
Remove the cross bar screw assembly, the hinges,
pins, the cross bar, the freezer door, the beater
assembly, the scraper blades, and the drive shaft from
the freezing cylinder. Also remove the adjustable shelf.
Take these parts to the sink for further disassembly
and cleaning.
Step 2
Remove the rear drip tray from the side panel.
Note: If the drip tray is filled with an excessive amount
of mix, it is an indication that the drive shaft seal should
be replaced or was improperly lubricated.
Brush Cleaning
Step 1
Prepare a sink with an approved cleaning solution
(example: Kay--5R or Stera--SheenR). USE WARM
W ATER AND FOLLOW THE MANUF ACTURER’S
SPECIFICATIONS.
If an approved cleaner other than (example: Kay--5 R
or Stera--SheenR) is used, dilute it according to the
label instructions. IMPORTANT: Follow the label
directions. Too STRONG of a solution can cause parts
damage, while too MILD of a solution will not provide
adequate cleaning. Make sure all brushes provided
with the freezer are available for brush cleaning.
Step 2
Remove the seal from the drive shaft.
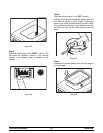
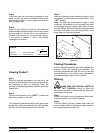
Step 3
From the freezer door:
Remove the keeper pin on the valve body. Turn the
draw rod handle and pull the draw rod assembly out of
the valve body. Unscrew the valve piston and slide the
bearing holder down off the draw rod. Remove the
o--ring from the valve piston and the bearing holder.
Remove the large o--ringand the front bearing from the
back of the freezer door. Remove the keeper pin from
the cover cap assembly and remove the cover cap
assembly.