


CM Oven Care and Use Manual
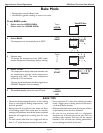
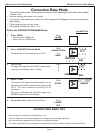
PREHEATING THE OVEN
• Preheat the oven when using the BAKE, CON–
VECTION, CONVECTION BAKE, ROAST,
COOKSMART and CUSTOM COMBINATION
with MICROWAVE modes.
• Preheat is optional for CONVECTION ROAST.
Preheating is not recommended for
CONVECTION ROAST when using the PROBE.
A hot oven impairs connecting the meat probe
into the receptacle and into the roast.
• Allow oven to preheat while preparing recipe or
food.
• Place racks in the oven before preheating.
• During preheat, the selected cooking temperature
is displayed and alternates with a display of the
actual oven temperature.
• The oven chimes once when it is preheated and
the selected cooking temperature is displayed.
OPERATIONAL SUGGESTIONS
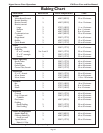
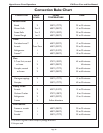
• Use the cooking charts as a guide.
• Do not set pans on the opened oven door.
• Use the interior oven light to view the food
through the oven door window rather than
opening the door frequently.
• Use TIMER 1 OR TIMER 2 to keep track of cooking
times.
UTENSILS
• Reduce oven temperature 25º when baking in glass.
• Use pans that give the desired browning.
For tender,
golden brown crusts, use light nonstick/anodized
or shiny metal utensils.
• For brown, crisp crusts, use dark nonstick/anodized
or dark, dull metal utensils or glass bakeware.
Insulated baking pans may increase the length of
cooking time.
• Do not cook with the empty broiler pan in the
oven, as this could change cooking performance.
Store the broil pan outside of the oven.
• Tips for “Solving Baking Problems” are found on
Page 57.
HIGH ALTITUDE BAKING
• When cooking at high altitudes, recipes and
cooking times will vary from the standard. For
accurate information, write the Extension Service,
Colorado State University, Fort Collins, Colorado
80521. There may be a cost for the bulletins.
General Oven Tips – Both Ovens
CONDENSATION / TEMPERATURE SENSOR
• It is normal for a certain amount of moisture to
evaporate from the food during any cooking
process. The amount depends on the moisture
content of the food. The moisture may condense
on any surface cooler than the inside of the oven,
such as the control panel.
• Your new Thermador
®
oven has an electronic
temperature sensor that accurately maintains the
temperature selected. Your previous oven may
have had a mechanical thermostat that drifted
gradually over time to a higher temperature. It is
common to experience an adjustment period
when cooking your favorite recipes in the new
oven.
OVEN RACKS
• Rack positions are numbered from the bottom rail
guide (#1) to the top (#6). Check the cooking
charts for the recommended position.
• To insert racks into the oven, hold the rack with
the back rail up and toward the back. Place the
safety hooks under the front of the rail guides.
Push the rack into the oven, lifting the rack stops
over the front of the rail guides. Slide the rack
into position.
• To remove racks or reposition racks in the oven,
pull the rack towards the front of the oven. Lift up
the front of the rack over the safety stops and pull
from the oven.
• Rack rail supports should not be removed from
the oven.
• CAUTION! Never use aluminum foil to cover the
oven racks or to line the oven. It can cause damage
to the oven can liner if heat is trapped under the
foil.
• When placing food on a rack, pull the rack out to
the stop position. The racks are designed to lock
when pulled forward.
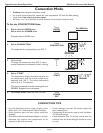
120/208 Volt Connection
• Preheat the oven for all cooking modes.
Preheat time will be slightly longer.
• Preheat the broil element with the door open
for 3 to 4 minutes or until the top element is
red. Do not preheat with the broil pan in the
oven.
• The Self-Clean mode may need a longer clean
time than normal, depending on the amount
of soil.
Upper/Lower Oven Operations
Page 33