


English 24
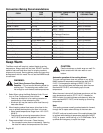
Using the Sabbath Mode
Sabbath Mode is for faiths with “No Work” requirements on
the Sabbath. It keeps an oven on at a specified
temperature for as long as it is required. The cook can
prepare a meal prior to a holiday and then leave it in the
always-warm oven until it is ready to be eaten.
• The oven lamp is disabled in Sabbath mode to prevent
any action from occurring at any time the door is
opened.
• The temperature in Sabbath Mode can be varied at any
time during the cooking process.
• The gas burners and griddle on the cooktop are still
fully functional during Sabbath mode.
• For double oven models, Sabbath Mode is available for
both ovens, but not at the same time.
• Sabbath Mode is only available when the range is not
already in another active cooking mode or Self-Clean.
• If the door is opened during preheat or during a cycle
operation, there will be no change to the current state
of the oven. That is to say, if the bake element was on
before the door was opened, the element will remain
on. If the element was cycled off just before the door
was opened, it will remain off even though it would
normally cycle back on with the call for heat. The
regular cycle will resume once the door is closed.
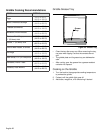
To set the Sabbath Mode:
1. Place rack and food at the desired rack position and
shut oven door.
2. Turn the Temperature Selector Knob (see Figure 31 on
Page 27) to desired selection.
• After both knobs have been turned to the desired
setting, the readout will display “Preheating [| …]”
with the selected cooking mode (for example,
“Bake”) and the desired temperature (“350°F/
177°C”).
3. Using the Oven controls, press the “+” or “-” buttons to
choose duration times from 0-99Hrs.
When the timer reaches “0:00”, the cooking mode will be
finished and the display will beep. The oven will
automatically turn off when the specified cooking time is
complete.
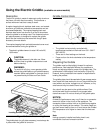
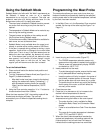
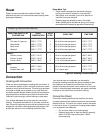
Programming the Meat Probe
The meat probe allows you more control over how your
foods are cooked by automatically disabling the specified
cooking mode when a dish's desired temperature, defined
by the cook, has been reached.
1. In the Main Oven, or in the Secondary Oven on select
models, flip the cap of the outlet up (see Figure 7 on
Page 11).
2. Insert the plug end into the outlet (Figure 27).
• The PROBE temperature selection screen only
appears when the probe is inserted into the plug-in.
• Control screen will automatically display PROBE
and default to 160ºF/ 71ºC
3. Insert probe end into the meat.
• To avoid damaging the probe, ensure that the meat
is fully defrosted before inserting the probe.
• Insert the probe until its tip is rested in the center of
the thickest, meatiest portion of the meat. Ensure
that the probe does not touch bone, fat, or gristle.
• The probe should not touch any part of the cooking
dish or parts of the oven, as this will affect the
accuracy of the results.
4. Close the oven door.
5. Press the (-) to decrease or (+) to increase to the
desired internal temperatures to be met.
6. Select the desired cooking mode and oven
temperature using the knobs on the control panel.
• The probe function is only available for Bake,
Convection Bake, Roast, and Convection Roast
modes.
• Probe is not available when Cook Timer has been
set.
• The range for the probe temperature is between
160ºF (71ºC) and 200 ºF (93ºC).
7. When the actual probe temperature reaches the
desired set temperature, the cooking mode will be
finished and the “end of cook timer” will beep to
indicate that the cooking process has concluded.
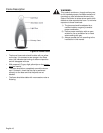
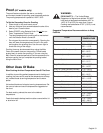
Figure 27: Meat Probe
Probe
Plug
Cable