


English 39
Do-It-Yourself Maintenance
Oven Light Bulb Replacement
CAUTION:
Before replacing the light bulb, be certain the
Oven Light Switch is in the off position. Let bulb
and cover cool completely before touching. If the
light bulb glass comes loose from the base, turn
the power to the oven OFF at the circuit breaker
panel before attempting to remove the bulb base
from the socket.
Replace only with a recommended light bulb designed for
appliance oven use. DO NOT USE a standard household
light bulb in any oven. Call THERMADOR
®
Customer Care
Center at 1-800-735-4328 or your nearest THERMADOR
®
dealer to determine the proper replacement bulb for your
range. You will need to know your range’s model number
and serial number.
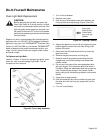
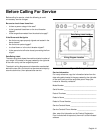
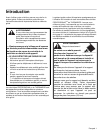
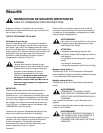
To Replace the Light Bulb:
Use only 10 Watt, 12 Volt bi-pin halogen light bulbs. Use a
clean, dry cloth to handle halogen light bulbs. This will
increase the life of the bulb.
1. Turn off circuit breaker.
2. Remove oven racks.
3. Slide the tip of a flat blade screw driver between the
fixing clip and the lamp housing (Figure 33 and 34.)
4. Support the glass lens cover with two fingers along the
bottom edge to prevent the cover from falling to the
bottom of the oven.
5. Gently twist the flat blade screw driver to loosen the
glass lens cover.
6. Remove the glass lens cover and fixing clip.
7. Remove the bulb by grasping and sliding the bulb
straight back until the two prongs have cleared the
ceramic holder.
8. Do not touch the glass of the new replacement bulb
with your fingers. It will cause the bulb to fail when it
first lights. Grasp the replacement bulb with a clean dry
cloth. Locate the two prongs in the ceramic holder,
gently poking until the two prongs locate in the ceramic
socket.
9. Press down to seat the bulb.
10. Slide the protective lens into the holder clip and push
the other end until the fixing clip snaps back into the
housing.
11. Turn on circuit breaker.
Figure 33: Oven Lamp Assembly
Figure 34: Opening Location