4
IMPORTANT
It is the customers responsibility to report any con-
cealed or non-concealed damage to the freight com-
pany.
IMPORTANT
The Batch Toaster may only be installed in a single-
unit, countertop configuration.
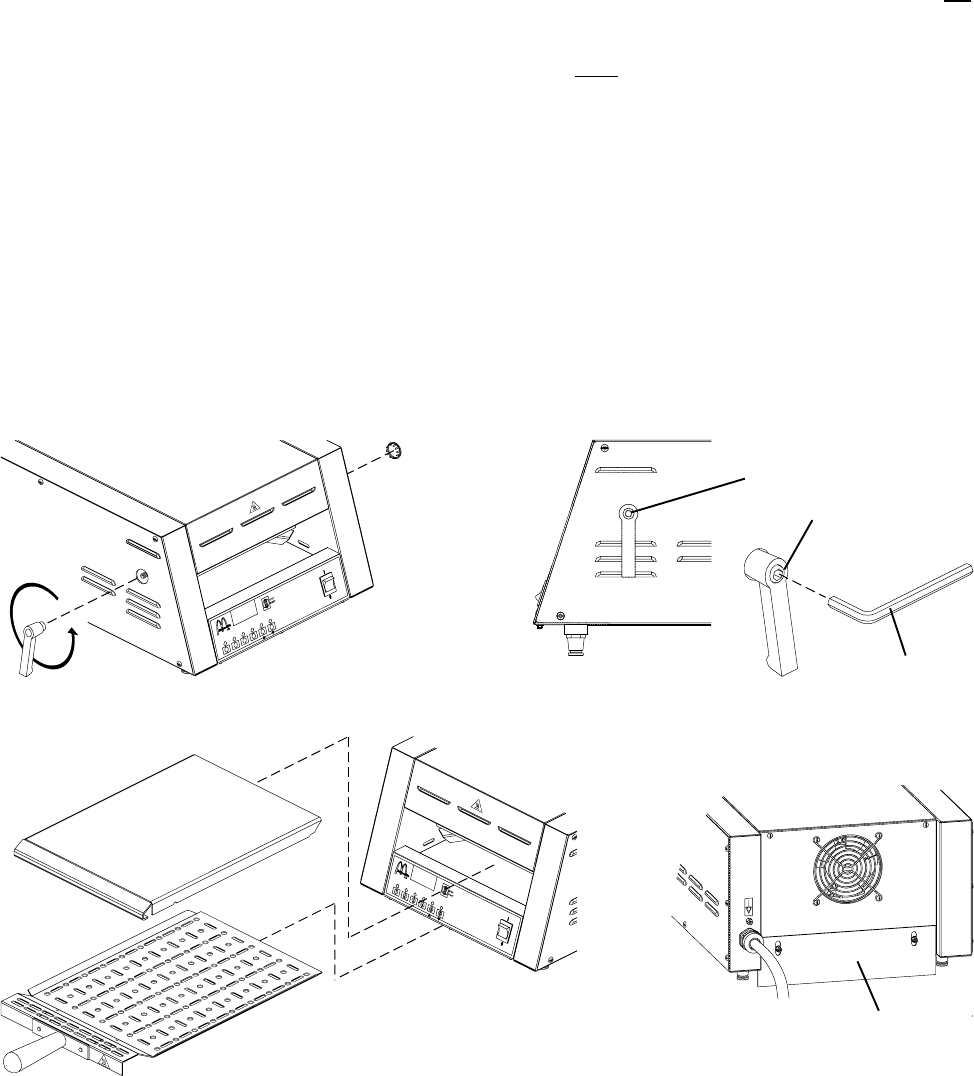
Assembly
1. Pull the door handle up and forward to open the
door. Then, remove all components from inside
the toaster.
2. Remove and discard all packing material from the
toaster and components.
3. Position the toaster in place. Adjust the bottom
section of each leg as necessary to level the
toaster.
4. Adjust the heat curtain at the rear of the toaster
so that it sits on the countertop. Tighten the screws
that hold the curtain in place. See Figure 2.
5. The door handle is pre-installed on the left side of
the toaster. If it is necessary to move the door
INSTALLATION
Figure 1 - Moving the Door Handle to the Right Side of the Toaster (if so desired)
Slide lower
deck into
toaster
Install legs (4). Then,
adjust bottom section
of legs to level toaster
Store peel
underneath
toaster
handle to the right side of the toaster, perform the
following procedure:
Rotate the door handle in a COUNTER-
CLOCKWISE direction until it is free of its
mounting shaft. See Figure 1.
Remove the round metal plug that covers the
handle mounting hole on the right side of the
toaster.
Reinstall the round metal plug into the left
handle mounting hole.
Install the handle in place on its shaft on the
right side of the toaster. Rotate it in a
CLOCKWISE direction until it is firmly in place.
Check that the door handle points DOWN
while the door is in the closed position, as
shown in Figure 1. If it is necessary to
reposition the handle, loosen its 5/32/4mm
Allen set screw. Reposition the handle, then
tighten the screw to fasten the handle in place.
6. Slide the lower deck into the toaster as shown in
Figure 2.
7. Store the peel in a clean, dry location underneath
the toaster.
1. Remove
door handle
2. Remove
plug
3. Reinstall
handle and plug
on OPPOSITE
sides of toaster
Figure 2 - Assembly
4. (If necessary) Loosen Allen
set screw and reposition
handle to point DOWN, then
tighten set screw
5/32/4mm
Allen wrench
(not supplied)
Adjust heat curtain to
sit on countertop, then
tighten screws (2)


