


4 GENERAL OVEN INFORMATION / INSTALLATION
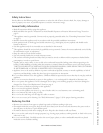
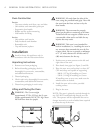
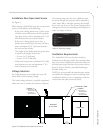
Figure 3: Hand Grip Locations
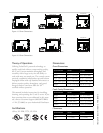
Oven Construction
Exterior
- Two-tone stainless steel front, top, and sides
- 304 stainless steel removable grease pan
- Ergonomic door handle
- Rubber seal for surface mounting
- Side handles for lifting
Interior
- 304 stainless steel interior
- Fully-insulated cook chamber
- Removable rack
- Top and bottom jetplates
Installation
Install or locate this appliance only in
accordance with the instructions below.
Unpacking Instructions
1. Remove oven from packaging.
2. Before discarding packaging, check it
thoroughly for accessories, consumables,
and additional literature.
3. Discard packaging.
4. Check cook cavity thoroughly for accessories,
consumables, and additional literature.
5. Discard any packaging in cook cavity.
Lifting and Placing the Oven
WARNING: The i5 oven weighs
approximately 275 lb. (125 kg); the i3 oven
weighs approximately 245 lb. (111 kg). Never
lift with fewer than two people.
WARNING: Lift only from the sides of the
oven, using the provided hand grips. Never lift
the oven from the front and rear or by the
door handle.
WARNING: The oven must be properly
placed on the table or countertop at all times.
TurboChef will not recognize a fallen oven as
a warrantable claim and is not liable for any
injuries that may result.
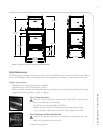
WARNING: This oven is not intended for
built-in installation (i.e., installing the oven in
any structure that surrounds the oven by five
or more sides). Be sure to provide a minimum
of 2” (51 mm) clearance for all sides and 19”
(483 mm) clearance for the top.
1. Position one or more persons on the left and
right sides of the oven.
2. Place hands into grips (see Figure 3) and lift.
3. Place the oven on a surface that is at least 30”
(762 mm) deep and capable of supporting
- 280 lb. (127 kg) if installing an i5 oven
- 250 lb. (114 kg) if installing an i3 oven
If installing onto an oven cart, make sure the
wheels/casters are locked.
4. Install the oven rack or other provided
cooking surface.
5. Plug in the oven.
NOTE: The oven is primarily serviced through its
top. DO NOT install shelving directly over the
unit. The operator will be responsible for service
charges incurred as a result of added time required
to access the top of the oven.