


THE INFO MODE14
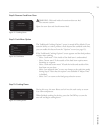
Overview of the Info Mode
The INFO MODE serves four main purposes:
1. To display general oven information.
2. To provide access to
TEST MODE and additional
diagnostic tools for service technicians.
3. To turn oven options and features on/off.
4. To update oven settings.
To access the
INFO MODE
, simply press the Info key
when the oven is either off or cooling down. To toggle
between the Info screen 1 and 2, press the Up or
Down key.
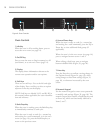
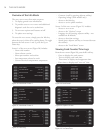
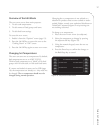
Screen 1 of the
INFO MODE (Figure 20) includes:
- Oven serial number
- Oven software version
- Menu part number and revision
- Last temperature selected to cook
- Current electrical compartment temperature
- Counters (scroll by pressing adjacent softkey)
- Operating voltage (USA models only)
- Access to the fault log
- Access to service phone numbers
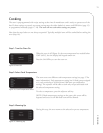
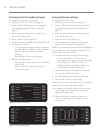
Screen 2 of the
INFO MODE
(Figure 21) includes:
- Access to
TEST MODE
- Access to the “Options” screen
- Language (set by pressing adjacent softkey - not
available on all models)
- Access to date/time settings
- Sound (press adjacent soft key to increase/decrease
the volume)
- Access to the “Load Menu” screen
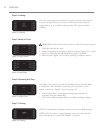
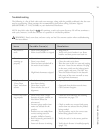
Viewing Cook Counter/Time Logs
From the INFO MODE (Figure 20), press the R1 soft key:
- Once to display the cook counter.
- Twice to display total cook time.
- Three times to display total magnetron time.
- Four times to display total “oven on” time.
MENU P/N AND REV
INFO 1
SOFTWARE VERSION
SP: 500F
EC TEMP: 84F
SERIAL NUMBER
FAULT LOGS
VAC = 240
SERVICE NUMBERS
COUNTS SCROLL
SET LANGUAGE
INFO 2
SET OPTIONS
SET DATE/TIME
TEST MODE LOAD MENU
SOUND = = = = = = 7
Figure 20: Info Mode Screen 1
Figure 21: Info Mode Screen 2
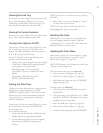
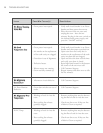
F6: EC OT
F8: HX RISE LOW
F1: BLOWER
F2: LOW TEMP
F3: MAG C LOW
F4: MONITOR
F5: MAG OT
FAULT LOG
8
0
0
0
0
F7: RTD OPEN
0
0
0
Figure 22: Fault Log
07/14/07 05:22
F1 FAULT DETAIL
07/14/07 13:54
07/14/07 22:07
07/15/07 08:36
07/18/07 14:35
09/26/07 17:42
12/04/07 20:18
MORE
Figure 23: Fault Detail
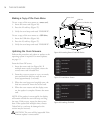
EDIT MODE
OVEN OPTIONS
COOK MORE
LOAD MENU
DEMO MODE
ADJ TIME DHCPOFF
ON
ON
OFF
ON
OFF
Figure 24: Options Screen
_
SET DATE/TIME
0 9 / 2 9 / 0 8 2 0 : 3 0
MM / DD / YY HH:MM
CANCEL
SAVE
<>
Figure 25: Set Date/Time
R1
R2
R3
R4
R5
L1
L2
L3
L4
L5
R1
R2
R3
R4
R5
L1
L2
L3
L4
L5
R1
R2
R3
R4
R5
L1
L2
L3
L4
L5
R1
R2
R3
R4
R5
L1
L2
L3
L4
L5
R1
R2
R3
R4
R5
L1
L2
L3
L4
L5
R1
R2
R3
R4
R5
L1
L2
L3
L4
L5