


www.U-LineService.com 8 02/2005
™
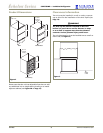
CO2075DWR — Ice Maker/Refrigerator
Full Overlay Drawer Panels
Drawer Panel Preparation
Full overlay drawer panels completely cover the drawer
fronts and handles to give a built-in appearance. Black
units are shipped ready for full overlay installation.
Note: For standard installations, both drawers mount the
same and a 1/2" gap is achieved between drawers.
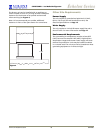
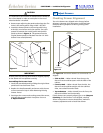
1. Cut the overlay to the following dimensions.
Full Overlay Dimensions:
Width: 23-3/4"
Height: 14-3/4"
IMPORTANT
The thickness of the wood overlay panel must be 3/4".
The door panel must not weigh more than 20 lbs.
Drawer Panel Installation
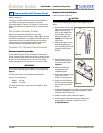
Removing Existing Drawer Fronts
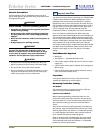
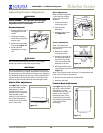
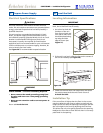
1. Open drawer. Pull drawer gasket out of groove (top
edge of drawer only). Start in the middle and pull
outward, moving toward the edge (see Figure 7). This
may take some force.
2. Remove and save the two screws located at the ends of
the handle (see
Figure 8
). Remove the handle.
3. Remove existing panel and cardboard spacer. Discard
the spacer.
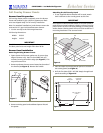
Attaching the Full Overlay Panel
1. If user-supplied cabinet handles will be used, attach
their hardware to the overlay panel at this time.
IMPORTANT
User-supplied cabinet handles MUST be counter bored to
make sure mounting hardware is below surface of overlay
panel. Failure to do so can cause damage to overlay panel
and/or drawer. Overlay panel will not sit flush to drawer if
mounting hardware is not counter bored.
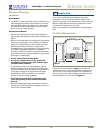
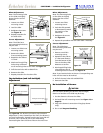
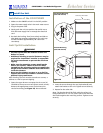
2. Place and tape the existing drawer panel on the back of
the overlay panel (see
Figure 9
).
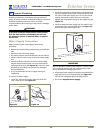
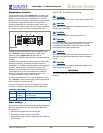
3. Drill the five holes (5/32
"
drill 3/8
"
deep) through both
panels according to
Figure 10
.
Gasket
Handle
Screw
Figure 7 Figure 8
Drawer Panel
Bottom of
Wood Panel
Back of
Wood
Panel
Side of
Wood Panel
Tape
11/32"
Bottom
3/8"
Both Sides
Figure 9
Top of
Wood Panel
14-3/4"
1"
11-7/8"
1"
23-3/4"
5/32" x 3/8" Deep –
5 Places
Vinyl Coated
Steel Panel
11-13/16"
1"
2-15/16"
Figure 10