


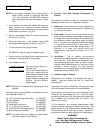

NOTE: On two section cabinets, when hinging door on
center mullion (left/left or right/right) add shim
3/16” thick aluminum, PN 05312701 between
each hinge barrel and door (as shown in Figure
2-6).
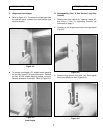
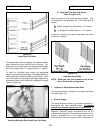
4. Pry out white nylon door cam, rotate 180° and push
down securely into alignment grooves. Remove
hinge bases from front of cabinet by removing phillips
head screws (as shown in Fig 2-3).
5. Remove lock keeper using a 5/16 open end wrench
(as shown in Fig 2-4).
6. Remount hinge base in new location, using 10-32
mounting screws supplied (as shown in Fig 2-3).
7. Fill old holes with filler plugs provided.
PN 50829101 plug for hinge and keeper holes.
8. Position door so that hinge pins of hinge barrel point
downward. Rehinge door on hinge bases.
9. Lock keeper mounting:
1 Section Cabinet
s
- Relocate single keeper to
opposite side.
2 Section Cabinets - For all door hinges left/left or
right/right, replace original
double keeper block with new
single keeper blocks. (Two
singles needed to replace one
double. Part #01368801
single keeper.)
NOTE: Rehinge kit is required when rehinging two door
cabinets.
Rehinge kit part number 99148001 is available for all two
door cabinets contents of:
(6) 3/16” thick aluminum door shims pn 05312701
(2) door keepers pn 01368001
(18) hole plugs pn 50829101
(4) base-fascia hinge shim pn 05072701
(2) ‘F’ 10-32 x 5/8” HH screws pn 50714301
(2) 10-32 x 5/8 HEX WSH tapping screw pn 50828901
(1) door rehinging instructions pn 80235301
NOTE: To rehinge half door models and three section
long door models, consult factory.
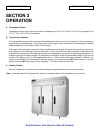
E. Locating Your New Storage Refrigerator or
Freezer
The following conditions should be considered when
selecting a location for your refrigerator or freezer:
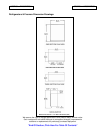
1. Clearance - There must be a minimum clearance of
10” between the top of the refrigerator or freezer and
the ceiling of the room.
2. Floor Load - The floor on which the cabinet will rest
must be free of vibration and suitably strong enough
to support the combined weights of the cabinet plus
the maximum product load which might be placed
into it. To estimate the possible product load weight
it is generally conceded that a safe figure is 35
pounds for each net cubic foot storage space. For
example, a 47 cubic foot cabinet could hold
approximately 1645 pounds of product (47 x 35 =
1645).
3. Ventilation - The air cooled, self-contained
refrigerator or freezer requires a sufficient amount of
cool, clean air. Avoid placing the refrigerator near
heat generating equipment such as ovens, ranges,
heaters, fryers, steam kettles, etc., and out of direct
sunlight. Avoid locating the self-contained
refrigerator in an unheated room, or where the room
temperature may be below 55°F.
F. Installing Legs or Casters
Refrigerators and Freezers are shipped with legs or
casters. Legs and casters are the 1/2” single stud
mounted type.
Legs require no tools for installation. Simply screw them
into the threaded holes located on the case bottom.
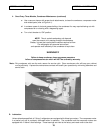
As for casters, first screw them into the threaded holes
located on the case bottom by hand. Once the caster
cannot be turned, take a 3/4” box wrench and tighten the
nut in between the mounting plate and wheel of the
caster until it is snug.
Tilt the cabinet in one direction approximately eight
inches and block it securely to keep it from falling. Use
several pieces of 2 x 4 lumber or other suitable material.
Screws the two left or right legs in snug. Repeat this
procedure to install the other legs with the case bottom.
WARNING
Never, Under Any Circumstances,
Lay Your New Refrigerator or Freezer
Down On Either It’s Back, Front or Sides.
8
SECTION 2-INSTALLATION SECTION 2-INSTALLATION