


4. Select desired programmed setting by pressing any of the Pre-Set
Buttons 1 through 6. The machine will begin immediately to cycle
through the selected program, and turn off when the program is complete.
Each button has a different pre-selected combination of speed and length
for blending.
NOTE: If you detect a change in the sound of the machine or if a hard or
foreign object comes into contact with the blades, do not serve the drink.
Inspect your blade assembly for loose, knicked or missing parts. If parts are
loose, missing or knicked replace with a new blade assembly. (See page 17).
5. Once one of the six PROGRAMMED buttons is pushed the machine will
start and stop automatically. By pressing another PROGRAMMED button
or the START/STOP button, the machine will stop the blending cycle.
6. During any of the blending cycles, by pressing the PULSE (H) button the
speed of the blending can increase up to 100% of the motor speed. By
pressing the PULSE (L) button during a blending cycle the speed of the
motor can be decreased down to 7%. Once released the motor speed
will revert back to the blending cycle of the PRE-SET PROGRAM.
NOTE: The PULSE high(H) and low(L) speed is set by using the SPEED
CONTROL buttons. To set, while pressing and holding a PULSE button,
press the SPEED CONTROL ▲ or ▼ button until the desired motor speed
is reached. The PULSE speed will remain at this setting until changed again
with the SPEED CONTROL buttons.
7. When the cycle is complete the blender stops, wait until blade comes
to a complete stop before removing the lid and/or container from the
motor base.
8. Remove the container, pour, garnish and serve the drink.
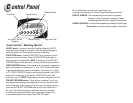
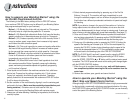
How to operate your Blending Station
®
using the
Start/Stop and Speed Control button.
Although using the PRE-SET PROGRAMMED buttons is highly recommended
for the best drink, occasionally a drink may need special attention. By using
the START/STOP button and the SPEED CONTROL button you can manually
control the speed of the Blending Station.
How to operate your Blending Station
®
using the
six Pre-Set Programmed buttons.
The following is the basic factory settings of the six PRE-SET buttons
(your machines PRE-SET buttons may be different if your Blending Station
was programmed specifically for your business).
• Button 1: (:15) Blends thin drinks with just juice and ice. This program
will quickly ramp to a high blending speed for 15 seconds.
• Button 2: (:20) Blends light coffee drinks. Button 2 will ramp the blending
speed to medium for six seconds and ramp up to high for 14 seconds.
• Button 3: (:32) Creates a specialty drink with a thick viscosity. Button 3
runs at a medium speed, ramps down, then increases to high speed,
and finishes the drink at medium speed.
• Button 4: (:34) This cycle is good for ice cream and regular coffee drinks
that need a little longer blending. Button 4 increases to medium speed
for four seconds then ramps up slowly to a high speed for 14 seconds.
• Button 5: (1:35) Blend a regular smoothie for an extended cycle. Button
5 runs for 45 seconds on a medium speed and then increases
in speed and runs on high for 50 seconds.
• Button 6: (:25) Blend thick frozen fruits & hard ingredients for a thick
but consistent smoothie. Button 6 gradually ramps up the blending
speed, maintaining intermediate speeds and gradually progressing
until it reaches full speed.
1. Place liquids and soft foods in the machines container first, solid items
and ice last. Prepare food by cutting or breaking into 1-3 inch pieces.
Frozen fruit, especially, should be as small as practical. Thawed or
partially thawed fruit is recommended. We recommend PRE-SET button
5 or 6 for heavy-duty blending.
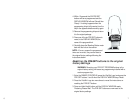
2. Set the container on the motor base by aligning it over the centering pad
anchored to the base. (Motor must be completely stopped before posi-
tioning container). Containers are not to be used for hard, dry
materials. Avoid running the Blending Station with container empty.
3. Always use a lid when blending. If blending hot ingredients, the lid must be
securely in place.
14 15
I
nstructions
CONTINUED ON PAGE 16