


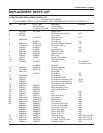
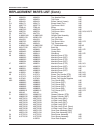
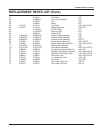
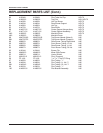
– 8 –
SERVICE & PARTS H SERIES
TEMPERATURE CONTROL RECALIBRATION
STANDARD OVEN TEMPERATURE CONTROL
RECALIBRATION
Field recalibration is seldom necessary and should not
be resorted to unless experience with cooking results
definitely proves that the control is not maintaining the
set temperature. To check oven temperatures when
recalibrating, use a Robertshaw Test Instrument or a
reliable mercury oven thermometer.
1. Place thermocouple of test instrument or thermom-
eter in the middle of the oven. Close oven door.
2. Light main burner.
3. Turn dial to any temperature setting and allow oven
to heat until flame cuts down to bypass. Let cycle
several times.
4. After burner has been on sufficiently long enough to
cut down the bypass flame, check oven temperature.
The control should be recalibrated if your reading is
not with 15° F of the dial setting. If recalibration is
required, proceed as follows:
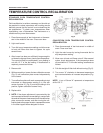
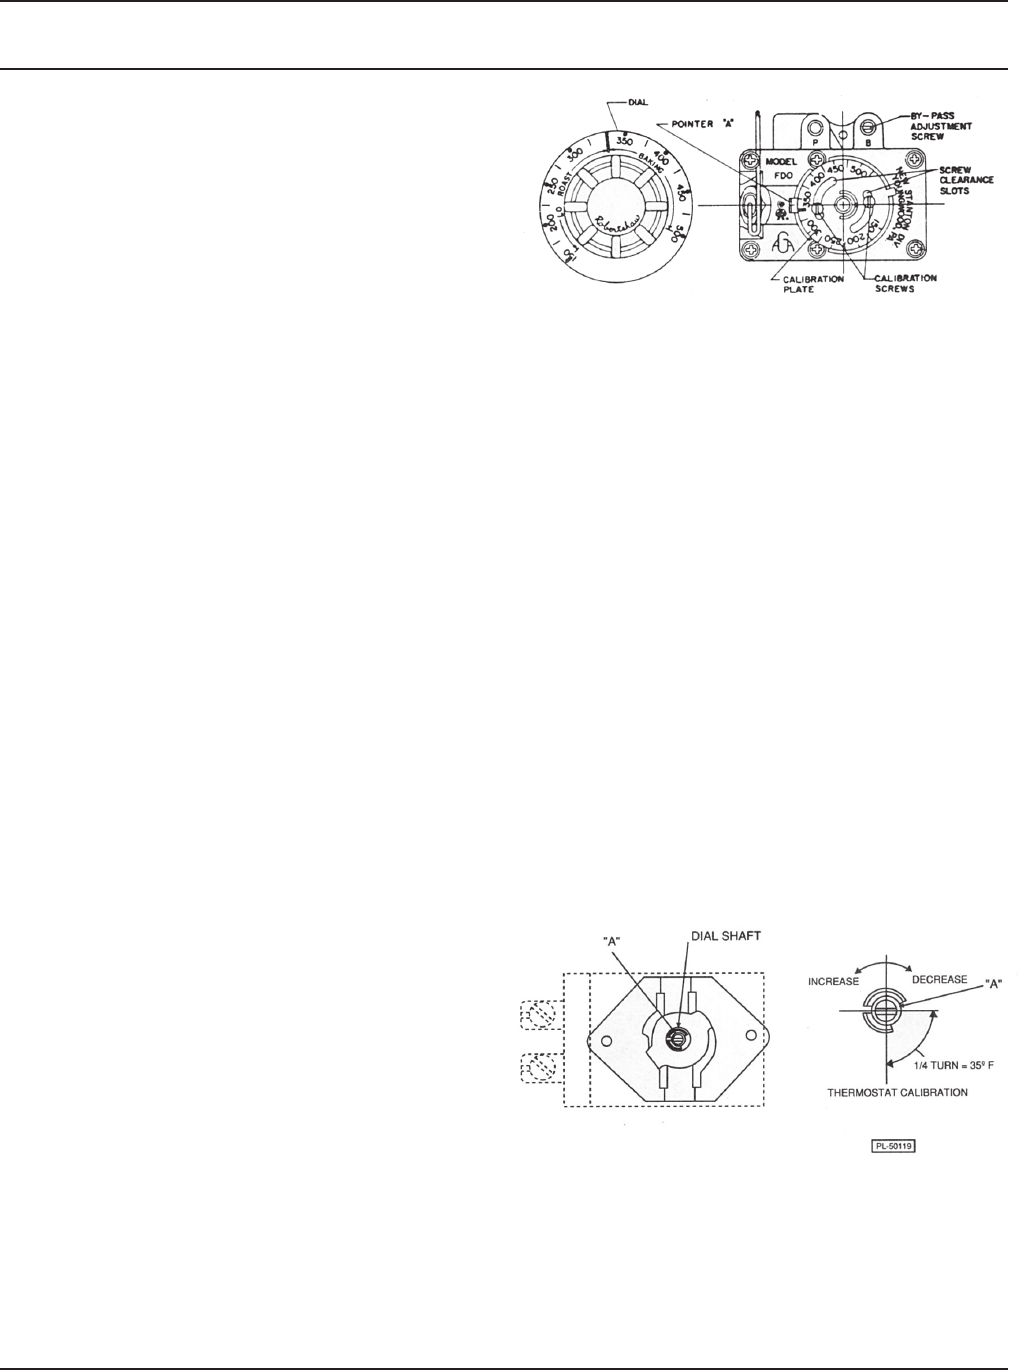
5. Remove dial.
6. With a screwdriver, loosen the two calibration screws
(Fig. 5) until calibration plate moves independently
of the control.
7. Turn calibration plate until mark corresponding to test
instrument or thermometer reading is in line with
center of pointer “A” (Fig. 5), and while holding in this
position, tighten calibration screws firmly.
8. Replace dial.
9. NOTE: If the above adjustment is prevented by the
two loosened calibration screws being in contact with
the ends of the screw clearance slots in the calibration
plate, remove the screws, and after turning the cali-
bration plate to the proper location, reassemble screws
in the other tapped holes designed for them.
Fig. 5
CONVECTION OVEN TEMPERATURE CONTROL
RECALIBRATION
1. Place thermocouple of test instrument in middle of
oven. Close oven door.
2. Light the main burner by turning thermostat dial to
any temperature setting.
3. Allow oven to heat until flame cuts off. After several
cycles, check temperature. If the temperature does
not read within 15° F of the dial setting, recalibrate as
follows:
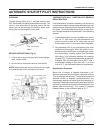
4. Pull dial straight off dial shaft without turning (Fig. 6).
5. Turn screw “A” clockwise to decrease temperature
and counterclockwise to increase temperature (Fig.
6).
NOTE:
1
⁄4 turn of Screw “A” represents a temperature
shift of 35° F.
Fig. 6