


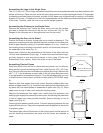

– 9 –
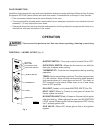
LIGHTING THE GCO2D OVEN
Open the manual valve. Turn the MASTER switch ON and turn the thermostat to its maximum setting. Both
the ON and HEAT lights should be lit. If the HEAT light is not on, make sure the door is closed.
After 5 seconds, the spark ignition system will initiate and the solenoid valve will open, allowing gas flow
to the burner for a period of 7 seconds. This 5 second purge and 7 second ignition trial will repeat itself up
to two more times if the burner does not light within the first 7 second ignition trial. During the 5 second
prepurge, the red NO IGNITION light will be lit.
When the burner gas ignites, a slight roar will be audible. This roar is a normal condition of the power
burner, and will become almost undetectable in the normal operating mode after warm-up. The NO
IGNITION light will go off when ignition occurs.
If the burner fails to light after three trials, the red NO IGNITION light will be illuminated and remain on. Turn
the MASTER switch OFF for five minutes before repeating the operating sequence listed above.
If burners do not light after five trials, turn off the manual valve and call a qualified servicer.
BEFORE FIRST USE
Before the oven is used for the first time, it must be "burned in" to release any odors that might result from
heating the new surfaces in the chamber.
Using a clean damp cloth, wipe the inside of the oven, including the racks.
Close the oven door, turn the MASTER switch ON, turn the thermostat to 300°F (149°C) and allow the oven
to cycle for 6 to 8 hours before turning the switch OFF.
USING THE GCO2D OVEN
Preheating
1. Turn the MASTER switch ON. The amber ON light will glow, indicating that power to the oven is on.
2. Set the THERMOSTAT as desired. Refer to SUGGESTED COOKING GUIDELINES — MODEL
GCO2D for temperatures and times for various products.
3. Prepare the product and place in suitable pans. When the white HEAT light goes off, the oven has
reached desired preheat temperature.
Cooking
1. Open the door and load the product into the oven. Place the pans in the center of racks. Close the
door.
2. Set the TIMER. After the preset time lapses, turn the timer OFF to stop the buzzer.
3. When the product is done, open the door and carefully remove the cooked product from the oven.
Wipe up any spills.
End of Day
1. Turn the THERMOSTAT OFF.
2. Turn the OVEN COOL switch ON.
3. Leave door ajar while the fan is on to cool the oven.
4. When oven has cooled sufficiently, turn OVEN COOL switch and MASTER switch OFF and clean the
oven.