


Adjusting the oven temperature control
Does your oven seem hotter or colder than your
old oven? The temperature of your old oven may
have shifted gradually without you noticing the
change. Your new oven is properly adjusted to
provide accurate temperatures. But, when
compared to your old oven, the new design
may give you different results.
If, after using the oven for a period of time, you
are not satisfied with the temperature settings,
they can be adjusted by following these steps:
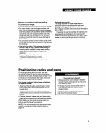
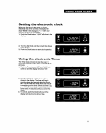
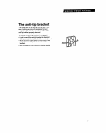
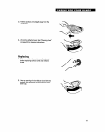
1. Turn the Oven Temperature Control Knob to
the off position. Pull knob straight off and flip
it over.
2. Loosen the locking screws inside the control
knob. Note the position of the notches.
3. To lower the temperature, hold knob handle
firmly and move the tooth a notch counter-
clockwise. Each notch equals about 10°F
(5°C).
4.
To raise the temperature, hold knob handle
firmly and move the tooth a notch clockwise.
Each notch equals about 10°F (5°C).
Tighten the locking screws and replace the
control knob.
Broiling
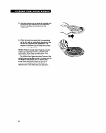
1. Position the rack properly before turning on
the oven. The oven rack should be positioned
so that the surface of the food is at least 3 in-
ches (7.4 cm) away from the broil element.
See “Broiling rack position chart” on page 14.
2. Put the broiler pan and food on the rack.
3. Close the door to the Broil Stop position (open
about 4 inches [lo.2 cm]). The door will stay
open by itself.
4. Set the Oven Selector and Oven Temperature
Control Knob to BROIL. The OVEN HEATING
Indicator Light will come on.
NOTE: Do not preheat oven when broiling.
5. When broiling is done, turn both the Oven
Selector and Oven Temperature Control Knob
to OFF. The OVEN HEATING Indicator Light
will go off.
Notch-
Tooth
Locking screws
13