


SERVICING - WARNING
Disconnect from electricity and gas before servicing. Check appliance is safe when you have finished.
8
16. To Change Oven Door Catch
Remove outer door panel (see 15). Remove
screws ‘B’ holding catch assembly to inner door
panel. Fit new catch and reassemble in reverse
order.
Check correct door operation.
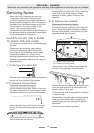
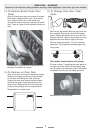
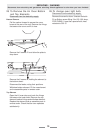
17. To Change Oven Door Seal
Open oven door. The seal is held in place by
small hooks on the rear face. At the corner pull
seal diagonally away from the door centre until
that hook is released. Proceed to the next hook
and release it in a similar way, and so on.
Fig. 4
When fitting new seal, position the seal join at
the bottom. Hook the new seal in one of the
corner holes of the door, and proceed round
the door snapping in each hook in turn.
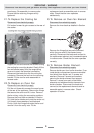
18. To Adjust Oven Door Catch Keep
Open oven door, slacken off locknut at base of
keep, and screw in or out as required until
required fit is obtained. Retighten locking nut.
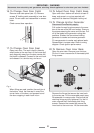
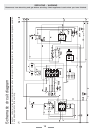
19. To Change Ignition Generator
Disconnect from electricity supply.
Pull cooker forward to gain access to the cover
box at the rear of the left hand cooker. Remove
the screws securing the cover and lift clear. Pull
off all the leads to the generator noting their
positions. Slacken the two screws holding
generator to cooker and remove generator.
Fit new generator to cooker and replace leads.
Reassemble in reverse order. Refer to wiring
diagram. Check ignition performance.
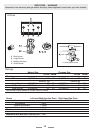
20. To Remove Oven Inner Back.
Open the oven door. Remove oven furniture.
For the LH oven unscrew the 2 thermostat phial
fixing screws.
Remove the fixings that secure the inner back
to the oven rear. Lift the removable panel away.
Re-assemble in reverse order. Ensure that the
retaining fixings are fully tightened. For the LH
oven unscrew the 2 thermostat phial fixing
screws. Remove the screws that secure the
inner back to the oven rear. Lift the removable