16
VARIETY STEAMER
P/N 1010649 Rev. E 03/07
TROUBLESHOOTING
WARNING
To avoid possible personal injury and/or damage to the unit, inspection, test and repair of electrical equipment
should be performed by qualified service personnel. The unit should be unplugged when servicing, except
when electrical tests are required. Use extreme care during electrical circuit tests. Live circuits will be exposed.
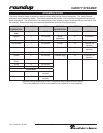
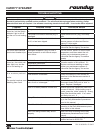
Problem Possible Cause Corrective Action
Power On/Off switch is
turned on, but the Switch
Indicator Light is still off
and the unit is not heating
up.
The power cord is not correctly plugged
in.
Plug the power cord in correctly.
The power cord and/or electrical plug is
damaged.
Inspect electrical wire, plug, and recep
-
tacle.
The main electrical panel circuit breaker
is off, or has been tripped.
Reset circuit breaker. Contact your main
-
tenance person or Authorized Service
Agency if it trips again.
Switch is inoperable. Contact your maintenance person or
Authorized Service Agency for service.
The unit’s main electrical
panel circuit breaker trips.
Damaged receptacle, plug, or cord; a
loose connection or an internal compo-
nent failure.
Turn the unit off, allow it to cool to room
temperature, and then restart the unit.
Contact your maintenance person or
Authorized Service Agency if condition
repeats.
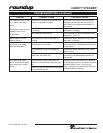
Power On/Off switch is
turned on, the switch indi-
cator light is on, but the
unit is not heating up.
Hi-Limit thermostat is tripped. Reset the Hi-Limit according to the
Operation section of this manual. If it
requires continuous resetting or repair,
contact your maintenance person or
Authorized Service Agency for service.
Inoperable Thermostat.
Inoperable Generator.
Loose/burnt wiring.
Unit heats but there is lit
-
tle or no steam produced
and/or
The product requires more
steaming than usual.
Water Line valve is closed. Check that the Water Line Valve is open.
Filter Strainer is restricted. Check and clean the Filter Strainer as
described in the Maintenance section of
this manual.
Quick Disconnect is not fully engaged at
rear of unit or is damaged.
Remove and re-engage the Quick
Disconnect Insert firmly until a “click” is
heard. Replace if damaged.
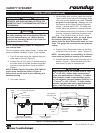
Low or no water pressure in water line. Remove the Quick Disconnect Insert from
the rear of the unit. While holding over a
bucket, press the “white” plastic tip. Strong
Water flow should be noted. If so, recon
-
nect firmly into unit. If
Spray Tube is restricted. Remove and clean the Spray Tube accord
-
ing to the Daily Maintenance procedures
found in this manual.
Black Manifold orifices are restricted. Remove and clean the Black Manifold
according to the Daily Maintenance proce-
dures found in this manual.
Unit is not being cleaned daily and/or
properly.
Clean unit Daily according to the Daily
maintenance procedures found in this
manual.
Improper water pressure to unit.
Verify that a Water Pressure Regulator is
installed and set to 20-25 PSI.