


8
VARIETY STEAMER
P/N 1010649 Rev. E 03/07
WARNING
BE SURE TO FOLLOW ALL GUIDELINES, PRO
-
CEDURES, AND PRECAUTIONS LISTED IN THE
IMPORTANT SAFETY INFORMATION SECTION OF
THIS MANUAL.
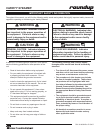
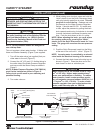
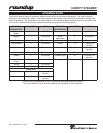
Figure 2. Connecting Water Supply
PLUMBING
NOTE: Variety Steamer models are designed to
use cold tap water.
This unit requires a direct water hookup. A Water Inlet
Hose and Strainer Assembly (Figure 2) are supplied.
1. Turn off the water valve (not supplied) that pro
-
vides water to the unit (Figure 2).
2. Connect the 1/4” (6.5 mm) I.D. flexible tubing to
the outlet side of the Water Pressure Regulator
and secure with the Worm Clamp as shown in
Figure 2.
NOTE: A Water Pressure Regulator (P/N 7000314)
must first be installed as shown in Figure 2.
Failure to do so will result in poor steaming and
possible flooding.
3. Turn water valve on.
CAUTION
This equipment is to be installed to comply with
the basic plumbing code of the Building Officials
and Code Administrators, Inc. (BOCA) and the
Food Service Sanitation Manual of the Food and
Drug Administration (FDA).
4. While holding over a bucket, press and hold the
“white” plastic tip on the Quick Disconnect insert
until good, steady water flow is noted. This will
purge all air out of the line. Release and note
the pressure on the Water Pressure Regulator
Gauge. If should read 20 PSI. If it reads more
or less, adjust the pressure by pulling the black
knob upwards and turning it clockwise to increase
(counter clockwise to decrease) the water pres-
sure. Push the knob down to lock it in place.
NOTE: When adjusting the knob, you must relieve
the existing pressure by pressing the “White”
plastic tip on the Quick Disconnect insert for 3 sec-
onds. The gauge will now show the new pressure
setting.
5. Push the Quick Disconnect insert into the fitting
at the rear of the unit until it “clicks.” (Figure 2).
NOTE: Incoming water is controlled by a solenoid
valve inside the electrical housing of the steamer.
6. Connect the black drain hose to the drip tray as
shown in Figure 2. Place the other end of the
drain hose in a drain or collection pan.
CAUTION
Water pressure must not exceed 30 psi (2.1 kg/
cm
2
or 207 kPa). Higher water pressures may
cause poor performance or flooding. To reduce
water pressure, install a water pressure regula-
tor, and set water pressure between 20-25 psi (1.4
- 1.7 kg/cm
2
or 138 - 172 kPa). To order a water
pressure regulator from your authorized service
center, order Roundup part no. 7000314.
INSTALLATION (continued)
Connect Quick
Disconnect
Insert Here
Front Legs
Raised
Slightly
Quick
Disconnect
Insert
Connect Black
Drain Hose Here
Inlet Hose & Strainer
Assy. (Supplied)
Water Pressure Regulator
& StrainerAssy. (P/N 7000314)
Shut Off Valve
(Not Supplied)
Cold
Water
Flow
Flexible Nylon Braided
1/4 " I.D. Tubing (Not Supplied)