


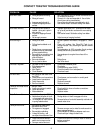
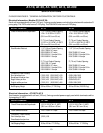
15
B. ASSEMBLY
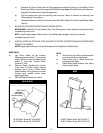
1. Lay the toast on its side and install four adjustable legs into threaded holes in base. Tighten
legs with crescent wrench. The unit may be leveled by unscrewing the lower insert of each
leg. Precise leveling is not required for proper operation of the toaster. Set the toaster
upright.
CAUTION: DO NOT OPERATE THE TOASTER WITHOUT THE LEGS INSTALLED.
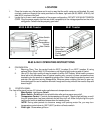
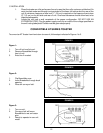
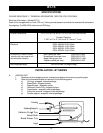
2. Refer to the illustration and check that the Reflector/Crumb Tray is in the proper position.
CAUTION: DO NOT OPERATE THE TOASTER WITHOUT THE REFLECTOR/CRUMB
TRAY IN POSITION UNDER THE CONVEYOR CHAIN.
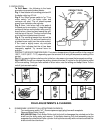
3. Check that the Bread Drawer is positioned flat on toaster base and pushed to the rear until it
stops. (Note: Bread Drawer is installed or removed by lifting the front handle at an angle so
that the rear edge of drawer slides under the two front internal studs on right and left sides of
toaster walls.)
4. Check that the Bread Slide is situated internally so that the "tabs" on each side are resting
behind the two rear internal studs on right and left sides of toaster walls. The front edge of
the Bread Slide rests on top of the two front internal studs on right and left sides of the
toaster walls. The Bread Slide should be covering the rear portion of the bread drawer.
5. Attach the superfeeder on the rod and pins located in front of the conveyor belt as shown in
the illustration.
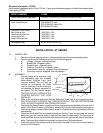
C. INSTALLATION
1. Place the toaster on a flat surface and in such a way that the unit's vents are not blocked. Air
must circulate under and through vents provided on the base, left side and at the rear of the
unit. A minimum clearance of one inch (1 ") (2.6 cm) is required on the base, both sides and
rear of unit. Overhead clearance should allow heat to be dispelled adequately.
2. Locate the unit near a wall receptacle of the proper configuration. DO NOT USE AN
EXTENSION CORD. Plug the power supply cord into an outlet of the voltage specified on
the unit's rating label plate. Outlets must be grounded properly.
OPERATING INSTRUCTIONS
A. PREPARATION/WARM-UP:
1. Main Power: Turn toaster on by pressing the Main Power switch up. Turn the toaster off by
pressing the Main Power switch down.
2. Temperature: Set the Top Heat knob and the Bottom Heat knob to the 6 setting (mid range)
for warm-up. (Power to the heating elements is off when these knobs are in the off position.)
3. Speed: Set the Conveyor Speed Knob to the 5 setting for warm-up. 4. Stand-By: Set the
Stand-By switch to Full Heat for bagels, muffins and "off" for light density products
like bread.
5. Warm-Up Time: Warm-up time is approximately 20 min. for bagels and muffins and 7 min.
For buns and bread.
B. USE/SPECIAL FEATURES
1. Product: Place product on the conveyor. It will automatically be drawn through the toaster at
a speed determined by the Conveyor Speed setting. Your product may be heated/toasted
on one side or both sides depending on where your temperature control knobs (top
heat & bottom heat) are set.
Caution: The product is inverted as it is returned to the operator. Therefore, toppings,
butter, or icings are not recommended.
Product over 4112" x 15/8" (11.5 cm x 4.2 cm) is not recommended.
2. Heating & Toasting Recommendations: The darkness or lightness of the toasting is
determined by the speed and temperature.
a) Speed 1 is the slowest setting and will help produce the darkest toast. "9" is
the fastest setting and will help produce the lightest toast.