


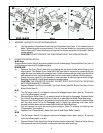
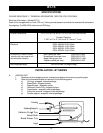
8
M-91: Push Butter Roller shaft to the right to disengage the notched end of the shaft from
the drive motor and remove. To facilitate cleaning, the shaft assembly may be separated
from the Butter Roller cylinder. Hold cylinder securely with one hand and slide the shaft
out with the other hand.
M-95: Lift left side of butter roller shaft out of "cradle" and remove. To facilitate cleaning, the
shaft assembly may be separated from the Butter Roller cylinder. Hold cylinder securely
with one hand and slide the shaft out with the other hand.
3. Remove Butter Pan (Item 3).
M-3: Lift the Butter Pan up and off the supporting pins.
M-91 & M-95: Slide Butter Pan toward the front of the unit and beneath the Butter Roller
bushings.
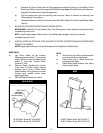
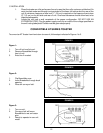
4. Remove Front Panel(s) (Item 4).
M-3: Remove the Top Front Panel (Item 4A) first by gripping the "two black knobs and lifting
up and slightly back. The Bottom Front Panel (Item 4B)can then be removed by holding the
top edge with one hand and pulling straight back. Next, hold the bottom edge with the other
hand and lift up and toward the front; then slide panel down and out between the Butter
Roller bushings.
M-93: To remove the Front Panel (Item 4) grasp the top edge with one hand and the bottom
edge with the other hand. Lift up to disengage slots in panel, then move forward and slide
down and out underneath the Butter Roller bushings: "
M-95: T0 remove the Top Front Panel (Item 4A) grip rear edge and lift up. The Bottom Front
Panel (Item 4B) can then be removed by holding the top e(jge with one hand and the bottom
edge with the other hand, then lifting panel up.
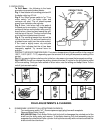
5. Remove Conveyor (Item 5).
Grasp Conveyor by the handles on each side and pull toward the front of the unit to
disengage gears. Gear engagement may be tight; if so, push the conveyor chain weights
slightly to rotate conveyor. Then lift Conveyor up and off the left and right Hangar Brackets.
CAUTION: THE CONVEYOR IS HEAVY. HOLD TIGHTLY.
6. Remove Bun Chute/Feeder/Super Feeder (Item 7). (M-83 & M-91 Only.)
M-83: Lift Bun Chute or Feeder up and off the back panel studs located at top rear of unit on
left and right sides.
M-91: Remove the Feeder/Super Feeder by gripping the sides and lifting up so that" support
"legs" slide out of the channels at rear of unit. "
7. M-83 Only - To remove the Bottom Rear Back Panel (not shown in illustration), face the rear
of the unit, grip the two black knobs, and lift up and off the left and right support pins.
8. M-91 Only - Remove lower Front Bun Slide (Item 8) by lifting up and off the support studs
and pulling forward.
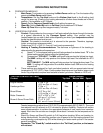
B. FIELD ADJUSTMENT OF GRILL PRESSURE:
Bun grilling is a function of THREE FACTORS: Speed, Temperature and Pressure. If speed and
temperature have been adjusted (see page 4), and optimum browning has not been achieved,
adjust the conveyor hanging brackets (Item 6A1B). loosen left and right brackets. Move them
equally toward the grill plate in 1/8" (.32 cm) increments and re-tighten screws. Adjust gear
engagement as needed with hanger plate bolts and lock nuts. CAUTION: Make sure grill plate is
cool.
C. CLEANING:
1. All of the parts removed from the unit may be placed in a dishwasher or sink for washing with
your usual detergent and hot water. Use a grill screen or plastic abrasive pad (Scotch Brite
pads are recommended) to remove stubborn baked-on oil from grill plate surface. DO NOT
use stee1 wool. Rinse thoroughly and dry. Oil chains after washing (apply toaster oil).
2. Grill Plate-Scour grill plate completely, rinse and dry thoroughly. Then coat with a light film of
toaster oil. (For baked-on oil use grill screen or Scotch-Brite pad).
3. Reassemble.