


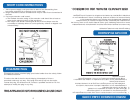
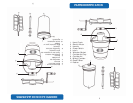
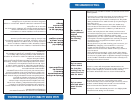
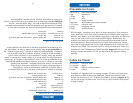
5. Coloque el bote en la cubeta de madera y asegúrese de
que el cono encaje en el centro de la cubeta (vea
“Dibujo 3”).
6. Deslice el extremo rectangular de la manivela manual o el
motor eléctrico en el agujero rectangular de borde de la
cubeta (vea “Dibujo 4”). El extremo opuesto de la
manivela caerá dentro del extremo abierto, donde está el
cerrojo (vea “Dibujo 6”). Suavemente levante el cerrojo a
fin de que el cerrojo de alambre pase sobre el extremo
redondeado de la manivela manual o del motor (tal vez
necesite rotar el bote con la mano para que la tapadera
quede ajustada al motor y/o a la manivela (vea “Dibujo 5”).
5
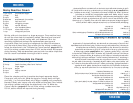
USING YOUR ICE CREAM MAKER
To Make Ice Cream:
5. Place the mixing canister in the wooden bucket and
make sure it engages the cone in the center of the
bucket (see “Figure 3”).
6. Slide the rectangular end of the hand crank or electric
motor into the rectangular hole on the rim of the bucket
(see “Figure 4”). The opposite end of the crank or
motor will drop into the open end, where the latch is
located (see “Figure 6”). Gently lift the latch so that the
wire goes over the rounded end of the hand crank or
motor. The mixing canister may need to be rotated by
hand so that the lid fits into the motor/hand crank (see
“Figure 5”).
Figure 3
Figure 6
Figure 4
Figure 5
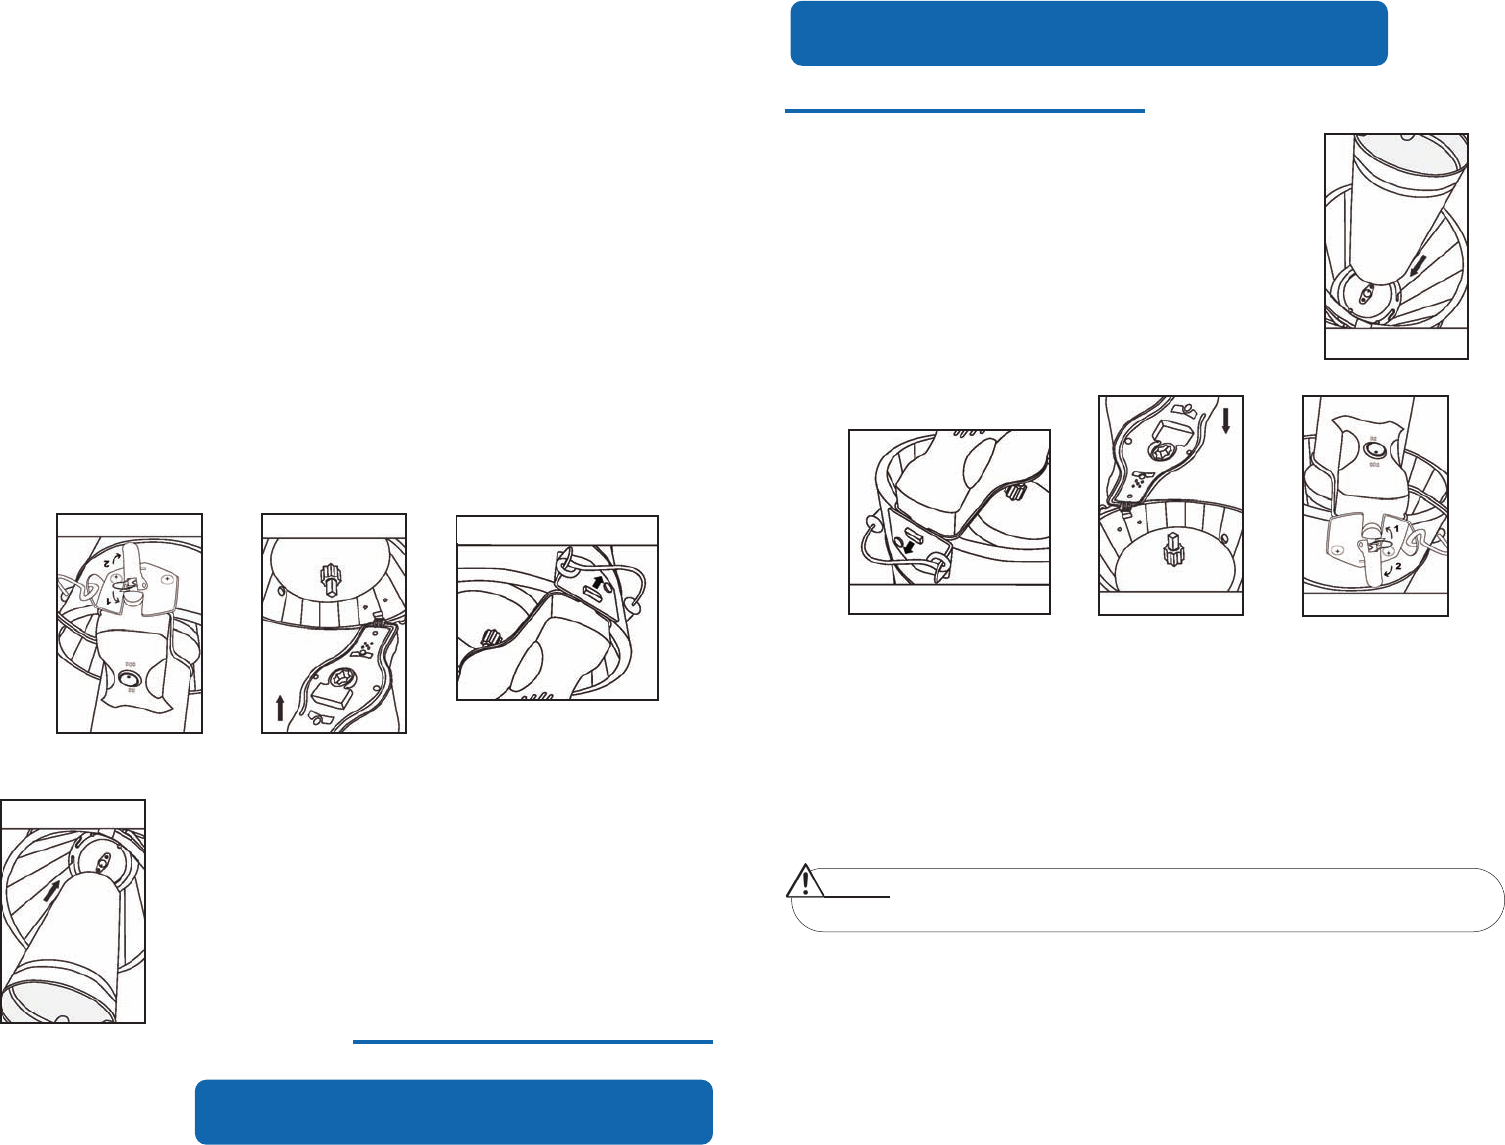
7. If you are using the electric motor, plug the power cord into a working
electrical outlet.
8. Fill the wooden bucket with a small layer of ice (about 6 cups), evenly
distributed around the base of the canister. Be sure that the ice added into
the bucket is broken into small, coarse pieces. A mallet or hammer may be
used to break the ice into smaller pieces, if needed. For each batch of ice
cream, expect to use 1-2 medium bags of ice.
9. Cover the first layer of ice evenly with a thin layer of rock salt (about
1/2 cup).
10. Repeat steps 8 through 9, layering the ice and salt until it reaches the
bottom of the drainage hole on the side of the wood bucket.
COMO USAR EL APARATO
Para hacer helado:
7. Conecte el cordón eléctrico en el tomacorriente si está usando el motor
eléctrico.
8. Llene la cubeta de madera con una capa de hielo (6 tazas
aproximadamente). Asegúrese que el hielo que usted ponga en la cubeta
esté quebrado en piezas pequeñas y gruesas. Tal vez necesite usar un mazo
o un martillo para romper el hielo en pedazos pequeños y gruesos. Para
cada bote del helado, se espera usar 1 o 2 bolsas medianas de hielo.
9. Agregue una capa de sal de piedra encima del hielo (1/4 taza
aproximadamente).
10. Repite los tramites 8 y 9 hasta que el hielo y sal llegue al nivel del agujero de
drenaje.
11. Agregue agua frío a la cubeta hasta que el parte superior del agua se
iguale con el agujero de drenaje.
12. Conforme el hielo se derrita de 2 a 3 pulgadas, agregue más hielo y sal de
piedra.
13. Gire la manivela o ponga a funcionar el motor. Mientras el bote dé vueltas,
revuelva y mezcle juntos la sal y el hielo. Utilice el agitador de plástico cada
10 ó 15 minutos, o más a menudo si es necesario, mientras esté en uso la
máquina para hacer helado.
5
Dibujo 3
Dibujo 4
Dibujo 6Dibujo 5
NOTE:
• Adding more ice will cause the mixture to leak out of the drainage hole.
11. Add cold water to the ice/salt mixture until the water level reaches the
bottom of the drainage hole.
12. As the ice melts down 2 to 3 inches, you may add more ice and more rock
salt to the mixture.
13. Begin cranking with the hand crank mechanism or turn on the electric
motor. As the mixing canister turns, stir and mix the salt and ice together. Use
the plastic stirrer every 10-15 minutes, or as needed, while the ice cream
maker is in use.