


9
ENGLISH
B. Stacking
For single ovens, skip ahead to Part C, Restraint Cable
Installation.
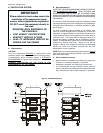
IMPORTANT
Blodgett STRONGLY RECOMMENDS that BG2136 oven cavities
be stacked using the following:
• PS500 Series Stacking Lift Kit, P/N 30580
• BG2136 Stacking Hardware Kit, P/N 46494
Contact your Blodgett Authorized Service Agent for complete
stacking instructions.
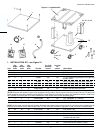
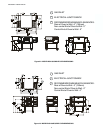
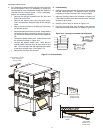
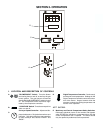
1. Stack an oven cavity on top of the lower oven. Check the
following:
• All four sides of the lower lip (on the bottom edge of the
oven cavity) overlap the top of the lower oven.
• The oven is level.
• The oven is firmly seated.
See Figure 2-8.
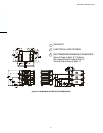
2. For triple ovens, repeat Step 1 to install the top oven cavity.
3. Install the top panel using the screws included in the base pad
kit, as shown in Figure 2-8.
SECTION 2 - INSTALLATION
Figure 2-8 - Stacking and Top panel installation
Top
panel
#10 x 2"
screws
C. Restraint Cable Installation
For CE-approved ovens,
skip ahead to Part D, Conveyor
Installation.
For domestic and standard export ovens,
continue with this
Section to install the restraint cable.
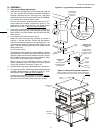
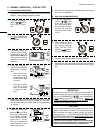
Because domestic and standard export ovens are
equipped with casters, a restraint cable assembly must be
installed to limit the movement of the appliance without
depending on the connector and the quick disconnect
device or its associated piping. One end of the cable is
anchored to the eyebolt on one of the rear leg extensions,
while the other is anchored to the wall. See Figure 2-9.
After connecting the restraint cable, move the oven to its
final location. Then, lock the two front casters.
3/8"-16 x 1"
eyebolt on
rear leg
extension
Restraint cable
assembly
3/4” (19mm)
eyebolt
Wall of
structure
Figure 2-9 - Installing the Restraint Cable