


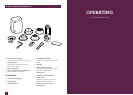
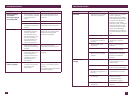

26 27
CARE & CLEANING
7. The cleaning cycle will commence and
last for approximately 5 minutes. During
this time, water will intermittently pour
from the group head. Once complete,
3 beeps will sound.
8. Remove the portafilter and ensure the
tablet has completely dissolved. If the
tablet has not dissolved, repeat until the
tablet has dissolved.
DECALCIFYING
After regular use, hard water can cause
mineral build up in and on many of the
inner functioning components, reducing
the brewing flow, brewing temperature, power
of the machine, and taste of the espresso. We
advise decalcifying the machine every month
and especially if not using the machine for an
extended period eg. before going on vacation.
1. Remove the portafilter.
2. Pour a 50/50 mixture of white vinegar
and cold tap water into the water tank.
3. Place a large container beneath the
group head and steam wand.
4. When the brewing temperature has been
reached and all the button surrounds on
the control panel
have illuminated, press and hold the
1 CUP button to commence a manual
pour. Release the button once half the
mixture of white vinegar and water has
run through the group head.
5. Set the STEAM/HOT WATER dial
to the hot water position and allow hot
water to run through the hot water outlet
for approximately
30 seconds. Return the dial back
to the STANDBY position.
6. Set the STEAM/HOT WATER dial to
the steam position and allow steam
to run through the steam wand for
approximately 2 minutes. Return the
dial back to the STANDBY position.
7. If any of the mixture remains in the
water tank, press and hold the 1 CUP
button to commence a manual pour.
Release the button once the tank is
empty and nothing runs through the
group head.
8. In harder water environments, we
recommend repeating this cycle.
9. After decalcifying, remove the water
tank and rinse thoroughly then refill
with fresh cold water only. To rinse
the machine, repeat the steps above.
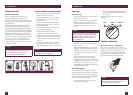
WARNING
Do not immerse power cord, power
plug or appliance in water or any other
liquid. The water tank should never be
removed or completely emptied during
decalcifying.
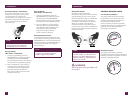
CLEANING THE STEAM WAND
• Immediately after texturing milk, turn
steam on to purge out any residual milk
from the steam wand then wipe the wand
with a damp cloth.
• If any of the holes in the tip of the steam
wand become blocked, ensure the STEAM/
HOT WATER dial is in the STANDBY
position. Press the POWER button to turn
the machine Off and allow to cool. Use the
pin on the end of the provided cleaning
tool to unblock the hole(s).
• If the steam wand remains blocked, remove
the tip using the integrated spanner in
the cleaning tool and soak in hot water.
Use the pin on the end of the provided
cleaning tool to unblock the hole(s) before
re-attaching to the steam wand.
CARE & CLEANING
CLEANING THE FILTER BASKETS
AND PORTAFILTER
• The filter baskets and portafilter
should be rinsed under hot water
immediately after use to remove all
residual coffee oils.
• If any of the holes in the filter basket
become blocked, use the pin on the
end of the provided cleaning tool to
unblock the hole(s).
• If the hole(s) remain blocked, dissolve
a cleaning tablet in hot water and
soak filter basket and portafilter in
solution for approx. 20 minutes.
Rinse thoroughly.
CLEANING THE SHOWER SCREEN
• The group head interior and shower
screen should be wiped with a damp
cloth to remove any ground coffee
particles.
• Periodically purge the machine. Place an
empty filter basket and portfilter into the
group head. Press and hold the 1 CUP
button and run a short flow of water to
rinse out any residual coffee.
CLEANING THE DRIP &
STORAGE TRAY
• The drip tray should be removed,
emptied and cleaned after each use
(after the auto purge feature, see page
17) or when the drip tray indicator is
showing Empty Me!
• Remove grill from the drip tray. Wash
both in warm soapy water. The Empty
Me! indicator can also be removed from
the drip tray.
• The storage tray can be removed and
cleaned with a soft, damp cloth (do not
use abrasive cleansers, pads or cloths
which can scratch the surface).
CLEANING THE OUTER HOUSING
& CUP WARMING TRAY
• The outer housing and cup warming tray
can be cleaned with a soft, damp cloth.
Polish with a soft, dry cloth. Do not use
abrasive cleansers, pads or cloths which
can scratch the surface.
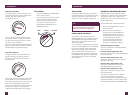
NOTE
Do not use abrasive cleansers, pads or
cloths which can scratch the surface.
Do not clean any of the parts or
accessories in the dishwasher.