


13
Continue to slide the spike until it is securely
imbedded in the food and secure spike by
turning the thumbscrew in a clockwise direction.
5. Check that the food is centred on the
rotisserie rod.
6. Place the wire rack, in the sunken position, into
the lowest rack support guide.
7. Place the enamel baking pan, without drip tray,
onto the wire rack to catch food drippings.
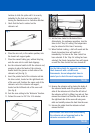
8. Use the rotisserie handle to lift the rotisserie rod,
ensuring to place the hooks of the rotisserie
handle under the grooves on both sides of the
rotisserie rod (See Fig 3).
9. Insert the pointed end of the rotisserie rod into
the drive socket, located on the right-hand side
of the oven wall. Position the square end of the
rotisserie rod in the rotisserie rod support,
located on the left-hand side of the oven wall
(See Fig 4).
10. Turn the oven setting to the ‘Rotisserie’ function.
11. Preheat the oven to 210°C for 5-10 minutes.
12. Set the Time Control to the desired time.
Alternatively, for continuous operation, turn the
timer to the ‘Stay On’ setting. The temperature
may be reduced at this time if necessary.
13. When finished cooking, a bell will sound and the
Pronto Convection Oven will switch off
immediately if a time on the Time Control has
been selected. If the ‘Stay On’ setting has been
selected, the Pronto Convection Oven will remain
on until the Time Control has been turned off.
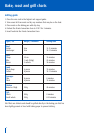
Use the Baking Guide for suggested roast times.
Check doneness with a reliable meat
thermometer. Use an independent timer to
remind you to check the meat temperature.
Note
14. Remove the rotisserie rod by placing the hooks of
the rotisserie handle under the grooves on both
sides of the rotisserie rod. Lift out the left side of
the rotisserie rod first, by lifting it up and out. Then
remove the rotisserie rod from the drive socket on
the right-hand side of the oven wall using oven
mitts and carefully remove the food from the oven.
15. Unscrew the spikes from the rotisserie rod and
remove the food.
Use insulated oven mitts when disassembling
the rotisserie rod and removing food as the
rotisserie accessories will be hot.
Note
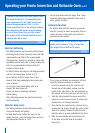
Fig 2
Fig 3
Fig 4