


16 17
OPERATING YOUR BREVILLE PRODUCTOPERATING YOUR BREVILLE PRODUCT
NOTE
When the machine creates steam, a
pumping noise can be heard. This is
normal.
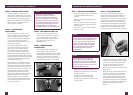
• Before inserting the Steam Wand into
the milk, pause the steam by returning
the Selector Control to the center
'Standby' position. Very quickly insert
the tip of the Steam Wand ¼-¾" (1-2cm)
below the surface of the milk, close to
the right hand side of the jug at the
4 o’clock position. Very quickly turn the
Selector Control back to the left 'Steam/
Hot Water' position. Pausing the steam
avoids the milk splashing out of the jug
(this pause function lasts for 5 seconds
only).
• Keep the tip just under the surface of the
milk until the milk is spinning clockwise,
producing a vortex (whirlpool effect).
• With the milk spinning, slowly lower
the jug. This will bring the tip of the
Steam Wand to the surface of the milk &
start to introduce air into the milk. You
may have to gently break the surface
of the milk with the tip to get the milk
spinning fast enough.
• Keep the tip at or slightly below the
surface, continuing to maintain the
vortex. Texture the milk until sufficient
volume is obtained.
• Lift the jug to lower the tip beneath
the surface, but keep the vortex of milk
spinning. The milk is at the correct
temperature (140-149°F or 60-65°C)
when the jug is hot to touch.
• Turn off steam BEFORE taking the tip
out of the milk.
• Set the jug to one side, immediately turn
steam on to purge out any residual milk
from the Steam Wand, then wipe the
Steam Wand with a damp cloth.
NOTE
Always clean the Steam Wand and
Froth Enhancer after every use. Refer
to 'Cleaning the Steam Wand & Froth
Enhancer', page 21.
• Tap the jug on the bench to collapse any
bubbles.
• Swirl the jug to "polish" and re-integrate
the texture.
• Pour milk directly into the espresso.
The key is to work quickly, before the
milk begins to separate.
NOTE
You may hear a vibrating noise
and notice water and steam is
automatically released into the Drip
Tray. This is normal, it is the Auto
Purge Function (see page 18).
TIP
If using the Froth Enhancer, do not
allow milk to run over the top of
the Enhancer otherwise it will not
function properly.
REMOVING THE COFFEE PUCK
• After texturing the milk, remove the
Portafilter from the Group Head. Turn
the Portafilter upside down and tap
firmly to remove the used coffee puck.
TIP
Due to high water pressure in the
Group Head, the used coffee puck will
be wet after extraction. For a drier
coffee puck, we recommend leaving
the Portafilter in the Group Head
while texturing milk. Once complete,
remove the Portafilter then tap out the
used coffee puck.
• The Filters are firmly lodged inside
the Portafilter to ensure they do not
get dislodged when the coffee puck
is tapped out of the Portafilter. To
remove the Filter, grip the grooves on
the Portafilter and lift the Filter out.
Alternatively, use the edge of another
Filter to leverage the Filter out of the
Portafilter.
• Rinse the Filter and Portafilter and allow
to dry.