


21
SERVICE (cont.)
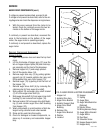
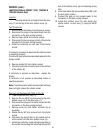
FROTHER AND WHIPPER MOTOR (cont.)
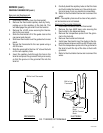
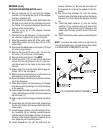
4. Remove dispense tip (3) and twist the whipper
chamber (4) clockwise and pull it off the whipper
chamber receptacle (8).
5. Pull the frother (6) off the motor shaft. Notice the
flat side on the shaft and the matching flat inside
the frother. It is important that these two flats are
lined up when reassembling.
6. Slip the o-ring (5) off the whipper chamber
receptical (8).
7. Remove the two #6-32 screws (7) securing whip-
per chamber receptical (8) to the front panel.
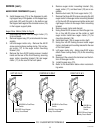
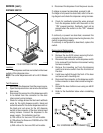
8. Slide the receptical w/seal off of the motor shaft.
9. Slide teflon washer (9) and o-ring (10) off of the
motor shaft.
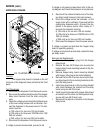
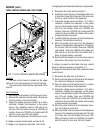
10. Disconnect the black leads on the motor (12) from
the main wiring harness.
11. Remove the two #8-32 acorn nuts (11) securing
the motor (12) to the rear of front panel.
12. Remove motor and discard. See NOTE.
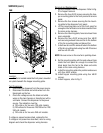
13. Install new motor (12) on rear of front panel and
secure with two #8-32 acorn nuts (11) and con-
nect black leads on the motor to the main wiring
harness.
14. Slide o-ring (10) onto the motor shaft to approxi-
mately 1/8” of the front panel.
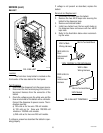
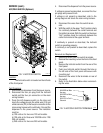
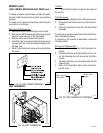
15. Wash remaining components in a mild solution of
dish detergent using a bristle brush.
16. Rinse thoroughly and allow to dry before reinstall-
ing in the dispenser.
17. Place teflon washer into back opening of whipper
chamber receptical and align one notch with bump
in the opening.
18. Slide whipper chamber receptacle w/seal on to the
motor shaft and secure to the front panel using two
#6-32 screws (7).
19. Slip o-ring (5) onto the whipper chamber receptical
(8).
20. Push frother (6) onto the motor shaft, making sure
the flat in the frother (6) lines up with the flat on the
motor shaft.
21. Install whipper chamber (4) on the whipper cham-
ber receptical (8) by twisting counterclockwise
until the tabs on the whipper chamber (4) lock with
the tabs on the whipper chamber receptical (8). Be
sure dispense port is pointing down.
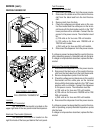
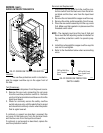
22. Install dispense tip (3) into the bottom of the
whipper chamber (4). Be sure the cutout part of
the dispense tip is facing the outside of the dis-
penser.
23. Slip the mixing chamber (2) onto the mixing
chamber water inlet tube far enough so the mixing
chamber (2) will seat inside the whipper chamber
(4).
24. Install the steam collector (1) onto the mixing
chamber (2) by pushing down and toward the
dispenser while twisting until the flange on the
steam collector lines-up with the slot in the front
panel.
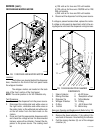
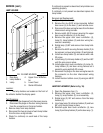
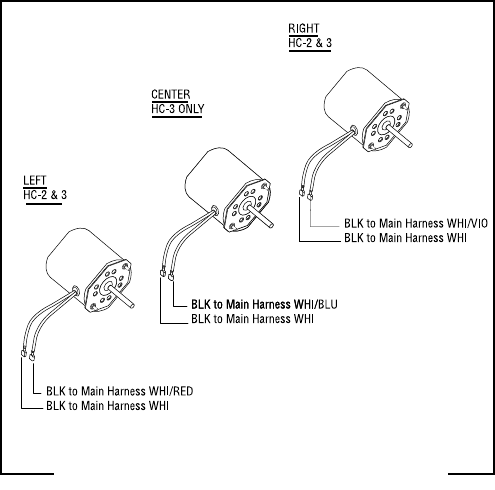
25. Refer to illustration below when reconnecting the
wires.
NOTE: To remove the center motor you also have to
remove the hopper assy., fan and exhaust tube. Refer
to AUGER DRIVE COMPONENTS and FAN.
FIG.13 WHIPPER MOTOR TERMINALS
P1207.50
27591 031597