


Page 5
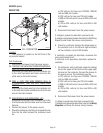
INITIAL SETUP
CAUTION - The brewer must be disconnected from the power source throughout the initial setup, except when specified
in the instructions.
IMPORTANT: Brewer must be level and installed on a sturdy structure.
Electrician's and Plumber's Instructions are provided. These instructions should be carefully followed
before proceeding with initial setup.
Be sure all electrical and plumbing connections are tight.
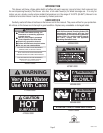
1. Open manual fill valve located on the bottom of the brewer. Water should start filling the tank. When water is visible
in the hot water gauge glass (center spigot), close valve. Approximate time for filling manually is 3 minutes.
CAUTION: Never leave brewer unattended while manually filling tank.
2. Connect the brewer to the power source. Turn "ON/OFF" switch to the "ON" position. Water should finish filling tank
automatically.
NOTE: It is recommended that the "ON/OFF" switch be left in the "OFF" position at the end of the operating day or when
unattended for a long period of time.
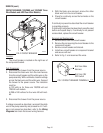
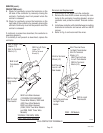
3. Disconnect the brewer from the power source. Remove front cupola cover for access to thermostat knob and timer.
On some brewers the thermostat knob is located on the front of the cupola cover.
4. Turn the thermostat knob clockwise to an approximate 5 o'clock position. Allow 1-1/2 hours for water to heat. Time
will vary with incoming water temperature.
5. On initial warm-up, some water may flow thru the overflow spigot due to expansion of the cold water in the tank.
This will not recur during the use of the brewer and may be avoided on the initial warm-up by drawing off 1/2 gallon
decanters of water each 15 minutes till brewing temperature is reached.
PLUMBING REQUIREMENTS
These brewers must be connected to a cold water system with operating pressure between 20 (138) and 90 psi (620 kPa)
from a 1/2" or larger supply line. A shut-off valve should be installed in the line before the brewer. Install a regulator in the
line when pressure is greater than 90 psi (620 kPa) to reduce it to 50 psi (345 kPa). The water inlet fitting is 3/8" flare.
NOTE - Bunn-O-Matic recommends 3/8" copper tubing for installations from the 1/2" water supply line. A tight coil of
copper tubing in the water line will facilitate moving the brewer to clean the countertop. Bunn-O-Matic does not recom-
mend the use of a saddle valve to install the brewer. The size and shape of the hole made in the supply line by this type
of device may restrict water flow.
10060 102808
This equipment must be installed to comply with the International Plumbing Code of the International
Code Council and the Food Code Manual of the Food and Drug Administration (FDA). For models
installed outside the U.S.A., you must comply with the applicable Plumbing/Sanitation Code for
your area.
CE REQUIREMENTS
• This appliance must be installed in locations where it can be overseen by trained personnel.
• For proper operation, this appliance must be installed where the temperature is between 5°C to 35°C.
• Appliance shall not be tilted more than 10° for safe operation.
• An electrician must provide electrical service as specied in conformance with all local and national codes.
• This appliance must not be cleaned by water jet.
• This appliance is not intended for use by persons (including children) with reduced physical, sensory or mental
capabilities, or lack of experience and knowledge, unless they have been given instructions concerning use of
this appliance by a person responsible for its safety.
• Children should be supervised to ensure they do not play with the appliance.
• If the power cord is ever damaged, it must be replaced by the manufacturer or authorized service personnel with
a special cord available from the manufacturer or its authorized service personnel in order to avoid a hazard.