Page 6
INITIAL SETUP (cont.)
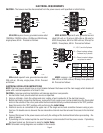
6. Brewing cycles may be started whenever water temperature is correct. This condition is indicated by the dial
thermometer on front of the brewer. Whenever the pointer is in the green, brewer is ready for brewing. The
recommended brewing temperature is approximately 200
°
F (93°C). Water temperature may be increased by
turning thermostat knob clockwise, decreased by turning knob counterclockwise.
7. When desired temperature is reached, insert funnel support, funnel and funnel cover in position. Be sure
the water swing spout is over the center of the funnel cover, turn "ON/OFF" switch to the "ON" position, push
and release "START" and run a brew cycle of hot water only. At the end of this cycle, brewer will be ready for
checking timer adjustment.
8. The timer has been preset for a 4 minute cycle. This setting will deliver approximately 3 gallons of water per
brewing cycle. To increase or decrease amount of water, adjust the timer as required. See Adjusting Brew
Volumes.
9. Having determined final settings of the thermostat and the timer, replace front cupola cover. Brewer is now
ready for brewing coffee.
ADJUSTING BREW VOLUMES
CAUTION - Disconnect the power source from the brewer prior to the removal of any panel for the replacement
or adjustment of any component.
NOTE: Prior to setting or modifying batch sizes, check that the brewer is connected to water supply, the tank is
properly filled, and a funnel support, funnel and funnel cover are in place.
1. Modifying batch sizes. To modify a batch volume, first check that the SET/LOCK switch is in the “SET” posi-
tion on the circuit board.
To increase a batch size. Press and hold the START or BREW switch until you see three breaks in the water
stream from the swing arm. Release the switch (Failure to release the switch within two seconds after the
third break in the water stream causes the volume setting to be aborted and previous volume setting will
remain in memory) and press it again one or more times. Each time the switch is pressed, two seconds are
added to the brew time period. Allow the brew cycle to finish in order to verify that the desired volume has
been achieved.
To decrease a batch size. Press and release the START or BREW switch once for every two-second interval
to be removed from the total brew time period; then immediately press and hold down the START or BREW
switch until you see three breaks in the water stream from the swing arm. Release the switch. (Failure to
release the switch within two seconds after the third break in the water stream causes the volume setting to
be aborted and previous volume setting will remain in memory). Allow the brew cycle to finish in order to
verify that the desired volume has been achieved.
2. Setting batch sizes. To set a batch volume, first check that the SET/LOCK switch is in the “SET” position on
the circuit board. Press and hold the START or BREW switch until you see three breaks in the water stream
from the swing arm, and then release the switch. (Failure to release the switch within two seconds after the
third break in the water stream causes the volume setting to be aborted and previous volume setting will
remain in memory). View the level of the liquid being dispensed. When the desired level is reached, turn the
ON/OFF switch to “OFF” (lower). The brewer remembers this volume and will continue to brew batches of
this size until the volume setting procedure is repeated.
NOTE: When brewing coffee, batch volumes will decrease due to absorption by the coffee grounds.
NOTE: HALF-BATCH AND FULL BATCH SETTINGS MUST EACH BE SET SEPARATELY.
3. Setting programming disable feature. If it becomes necessary to prevent anyone from changing brew times
once programmed, you can set the SET/LOCK switch to the “LOCK” position. This will prevent any program-
ming to be done until switch is once again placed in the “SET” position.
10060 080900


