


13 14
GB
GB
GB
GB
• Do not fill in water if the appliance is hot. Always turn off the appliance
and cool down before filling in water.
• Use fresh and cold water only.
• The coffee/espresso pot may only be used with a closed cover and in
combination with this appliance.
• Never switch on the appliance without any water in the water
tank.
INTENTED USE
• This appliance is for household use only and has to be used to brew
coffee and espresso. The appliance is not meant for the commercial or
industrial use.
BEFORE INITIAL USE
• Remove all packaging material.
• Clean the unit as described under
Cleaning and Care
.
• Important! Before initial use, perform two to three run-throughs with
both, the coffee and espresso machine, without coffee, as described in
the following. Open the steam valve when preparing espresso for
approx. 5-10 seconds to clean the pipe of the steam nozzle. Small
quantities of smoke and smell may emit at the first run, this is normal.
After the run-throughs rinse all detachable parts with hot water.
OPERATION
Espresso preparing
• Pull out the power cord (10) of the power cord storage (9) at the back
side of the device. Do NOT connect the power plug with the power
supply.
• Open the cover (3).
• The espresso pot has markings for the amount of water filling for 2
and 4 cups of espresso. Mind these markings to prepare the
corresponding number of espresso cups. Open the espresso machine
lock (1) and fill in the corresponding water quantity into the water tank
(2) with support of the espresso pot (22).
• Turn the lock tightly.
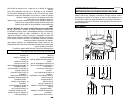
• Insert the espresso filter (24) into the espresso filter holder (23) and
fold the filter lock (25) over the edge of the filter.
• Put the corresponding amount of espresso coffee into the filter with the
measuring spoon (28). Mind the markings inside the espresso filter.
• Press the coffee softly with the head of measuring spoon (27).
However, do not press too tightly as this can cause congestion and
overflowing. Remove surplus coffee powder from the edge of the
espresso filter to ensure a good fit at the filter holder photo. The
topmost marking in the filter may not be exceeded.
• Pull back the filter lock (25) with the thumb and insert the espresso
filter holder from below in the filter holder (18). The handle (26) of the
espresso filter holder must show on the arrow Turn the handle of
the espresso filter holder to the right on position LOCK until stop.
• Put the collection tray (15) with an inserted grid (16) in the tray holder (14).
than 30mA. Ask your electrician for advice.
• Make sure that there is no danger that the cord or extension cord may
inadvertently be pulled or cause anyone to trip when in use.
• If an extension cord is used it must be suited to the power consumption
of the appliance, otherwise overheating of the extension cord and/or
plug may occur.
• This appliance is not suitable for commercial use nor for use in the open
air.
• Never leave the appliance unattended while it is in use.
• Children cannot recognise the dangers involved in the incorrect use of
electrical appliances. Therefore never allow children to use household
appliances without supervision.
• Always remove the plug from the socket when the appliance is not in
use and each time before it is cleaned.
• Danger! Nominal voltage is still present in the appliance as long as the
appliance is connected to the mains socket.
• Switch the appliance off before disconnecting from the mains.
• Never use the cord to carry the appliance.
SPECIAL SAFETY ADVICE
• Only fill cold and decalcified water into the water tank.
• Danger of burns: The cabinet and metal parts will get hot during
operation.
• Do not move the appliance while hot water is filled in.
• Only connect the appliance with the power supply system when both
switches are in 0 position.
• During operation the espresso machine is pressurized. Before you
take off the filter holder, let the steam come out of the steam nozzle.
• The water tank must be always filled with enough water. Use the
appropriate markings to measure the exact amount of water.
• The coffee and espresso pot must only be used in combination with
this appliance. Extremely hot or extremely cold liquids must not be
filled into the pots.
• Do not use accessories which are not supplied with the packaging or
which are not provided by the manufacturer.
• The power cord must not wind round the appliance. It has to wind
round the its bottom side and keep the cord always away from the
appliance’ hot surfaces.
• The appliance must always be placed at a stable, flat and anti-skidding
surface. Otherwise it might cause injuries or damages on the
appliance.
• Never switch on the appliance, without placing the pots under their
outlets.
• Danger of burns! The cabinet will get hot during operation. Only hold
the coffee/espresso pot on its handle, because it will get warm during
operation. Likewise, upcoming damp of the hot filter might cause
burns.
• Do not use the pots, when they are damaged or have loosened
handles.
53 54
• Ponga la cantidad adecuada de café exprés en el filtro con la cuchara
de medir (28). Considere las marcas en el filtro de espresso.
• Presione suavemente el café con el extremo de la cuchara de medir
(27). No obstante, no presione demasiado porque podría causar
congestión y desbordamiento. Retire el excedente de café del filo del
filtro de espresso para asegurar una buena fijación al soporte del filtro.
La marca de tope no debe ser excedida.
• Retire el cierre del filtro (25) con el pulgar e inserte el soporte del filtro
de espresso desde abajo en su soporte (18). El asa (26) del soporte
del filtro de espresso debe mostrar la flecha Gire el asa del
soporte del filtro de espresso hacia la derecha a la posición LOCK
hasta detenerse.
• Ponga la bandeja de goteo (15) con una rejilla insertada (16) en su
soporte (14).
• Ponga la cubierta (21) en la cafetera de espresso (22). Ponga la
cafetera de espresso en la rejilla de la bandeja de goteo y lleve la
muesca de la tapa bajo la apertura del soporte del filtro de espresso
(23).
• Conecte el cable de corriente (10) a una toma adecuada de corriente.
• Presione el interruptor I O (13) de la máquina de espresso a la
posición I. Coloque el control de vapor y de espresso (19) en la
posición de espresso.
El indicador de potencia de los indicadores de I O se encenderá y
comenzará el proceso de preparación.
• Tras aproximadamente 2 o 3 minutos, el agua se calentará y el café
exprés empezará a verter sobre la cafetera de espresso.
• Cuándo todo el agua agregada haya pasado, coloque el control de
vapor y de espresso (19) en la posición de O y el control I O (13) en la
posición O para apagar el aparato. El indicador luminoso de potencia
en ese botón se apagará.
• Nota para la preparación del capuchino: La cantidad de agua para
preparar el capuchino es mayor. Para hacer 2 tazas de capuchino,
rellene de agua hasta quedar entre la marca de 2 y de 4 en la
cafetera de espresso. Vierta agua para 4 tazas, hasta el final inferior
del asa metálica.
• El café exprés ya puede ser servido. Sostenga la cafetera únicamente
por su asa (26). ¡Peligro de quemaduras!
• ¡Precaución! Deje un tiempo al vapor que aún queda en la
boquilla de vapor (17) antes de retirar el soporte del filtro o de
abrir el cierre del depósito de agua. Gire el control de vapor y de
espresso (19) en la dirección de despacio.
Leche espumosa (para el capuchino)
• Prepare espresso como se describe arriba. Asegúrese de que rellena
el depósito de agua de la máquina de espresso (2) con la cantidad
suficiente de agua para hacer espuma de la leche después de la
preparación de espresso. (La zona menor del anillo de metal en la
cafetera de espresso se corresponde con 4 tazas de espresso más
vapor suficiente para hace espuma de la leche para el capuchino).
• La leche se puede hacer espumosa después de haber preparado el
espresso.
• Rellene un recipiente resistente al calor con aproximadamente 100ml
de leche y sosténgalo bajo la boquilla de vapor (17). Considere que
aproximadamente se duplica el volumen de leche cuándo se hace
espumosa. La boquilla de vapor siempre debe estar sumergida bajo la
superficie de la leche ya que de otra manera la leche podría salpicar
fuera del recipiente. Sumerja la boquilla de vapor levemente bajo la
superficie de la leche. Cuándo el volumen se haya doblado, sumerja
la boquilla más profundamente para calentarla entre 65º C y 75º C.
Nota: No hierva la leche. Sabrá cuándo sucede eso si el volumen
crece repentinamente con grandes burbujas.
• Gire despacio hacia la izquierda el control de vapor y de espresso (19)
desde la posición 0 hasta la posición de vapor Controle el nivel de
vapor con el control de vapor y de espresso (19). Saldrá la máxima
cantidad de vapor cuándo dicho control esté girado en la dirección de
hasta que se detenga. El vapor es bombeado hacia la boquilla de
vapor y la leche puede ser hecha espuma.
• Tan pronto como haya convertido en espumosa la suficiente leche,
retorne el control de vapor y espresso a la posición O y pulse el
interruptor I O (13) de la máquina exprés a la posición O.
• ¡PRECAUCIÓN! Retorne el control de vapor y espresso a la posición
O antes de retirar el recipiente con la leche de la boquilla de vapor.
¡Peligro de quemaduras!
• ¡PRECAUCIÓN! No abra la tapa del recipiente de presión de vapor (1)
después la producción de vapor hasta que los restos de vapor hayan
desaparecido completamente de la boquilla de vapor. Dichos restos
podrían causarle heridas o daños.
Preparando café
• Abra la tapa de la máquina de café (3). Rellene de agua con el
número deseado de tazas en el depósito de agua de la máquina de
café (4). El número de la taza está marcado en el recipiente de cristal.
Nunca rellene el depósito de agua por encima del nivel de 10 (10
tazas de café).
• Gire el soporte del filtro (7) a un lado e inserte el filtro permanente (6)
en el soporte. El filtro permanente tiene un asa (5) para facilitar el
insertado y la retirada. Baje el asa antes de insertar.
• Coloque la cantidad requerida de café en el filtro de café con la
cuchara de medida (28) y gire el soporte del filtro hasta que haga clic.
• Coloque la cafetera (32) con la tapa cerrada (31) en el plato para
conservar la temperatura (11). Presiónelo con una presión sencilla
sobre el freno de goteo (8). Asegúrese de que el freno de goteo (8) es
presionado por completo hacia arriba, es decir la cafetera esta
nivelada y colocada sobre el plato de mantener la temperatura (11).
• Conecte el enchufe (10) a una toma de corriente.
• Presione el interruptor I O (12) a la posición I. La luz indicadora en el
interruptor se encenderá y comenzará el proceso.
• Mientras el café se está haciendo en la cafetera, se puede retirar
E
E
E
E