


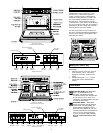

6
6
Multiple Rack Baking
The uniform air circulation provided by
Convection™ cooking enables the more oven
capacity to be utilized. Many foods, such
as pizzas, cakes, cookies, biscuits, muffins,
rolls and frozen convenience foods can be
successfully prepared on either two or three
racks at the same time. Additionally, complete
meals can be prepared by using multiple racks.
See below for specific recommendations.
Follow the steps in the Oven Modes section, to
manually operate the oven, or refer to the Delay
Timed Cooking section below for automatic
operation.
MULTIPLE RACK BAKING TIPS
1. Typically, when baking on two racks, rack
positions #1 and #4 or #2 and #4.
2. When adapting a single rack recipe to
multiple rack baking, it may be necessary
to add to the baking time. This is due to the
extra mass of food in the oven.
Delay Timed Cooking
This function allows the user to start and finish
a cooking cycle automatically. It is especially
useful for preparing meals in advance, cooking
while you are at work or play. Delay Timed
Cooking can only be used with Standard Bake
(ERD model only), Convection Bake, or Pure
Convection modes. lt will not function in Broil
mode.
WARNING:
Food safety is an important consideration
when using delayed cooking modes. To
avoid potential sickness and spoiling of
food, take the following steps:
1. Avoid using foods that will spoil while
waiting for the cooking cycle to begin.
Typical foods to avoid include those
containing eggs and dairy products,
cream soups, and cooked or uncooked
meats, poultry and fish.
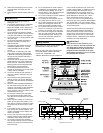
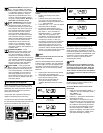
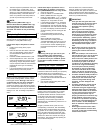
TIMER 1 CLOCK STOP TIME TIMER 2
OVEN STOP TIME
DELAY TIMED BAKE
Setting the Oven for Delay Timed Cooking
To use Delay Timed Cooking, follow these
steps:
1. Position oven rack(s) at the proper
height(s).
2. Place the food onto the center of the oven
rack(s).
3. Select the desired cooking mode and
temperature.
4. Press the “COOK TIME” pad and “TIME”
will appear in the clock display. Press the
“TIME•TEMP” “+” pad to set the length
of time that the food will be cooked. The
“COOK TIME” can be set from 5 minutes to
11 hours, 50 minutes.
5. The oven can be set to start now or later
in the day. To start cooking now, do not
perform any more programming steps. After
six seconds “PRE”, “ON” and “TIMED” will
appear in the clock display, and the oven
will begin heating. After the “COOK TIME”
has expired, the clock will beep three
times, and “Hold” will be displayed. The
cooling fan will continue to run, depending
upon the length and temperature of the
cooking process.
6. Press the “STOP TIME” touch pad, and
“STOP” will appear in the clock display.
Press the “TIME•TEMP” “+” pad to enter
the time of day that you wish the oven to
shut off. “DELAY” will now be displayed.
The oven will calculate the correct “START
TIME.” After the “COOK TIME” has expired,
the clock will beep three times, and “Hold”
will be displayed. If cooking in a convection
mode, the convection fan will also turn
off at this time. While in “Hold” mode, the
oven temperature will be maintained at
150˚F for a period of two hours. “Hold”
mode can be cancelled by pressing the
“CANCEL•SECURE” touch pad. The
cooling fan will continue to run depending
upon the length and temperature of the
cooking process.
DELAY TIMED COOKING TIPS
1. Do not use foods containing baking powder
or yeast in Delay Timed Cooking. These
foods will not rise properly.
2. Remember that “COOK TIME” refers to
the length of the cooking cycle. It does not
refer to the start time!
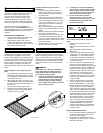
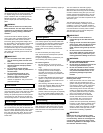
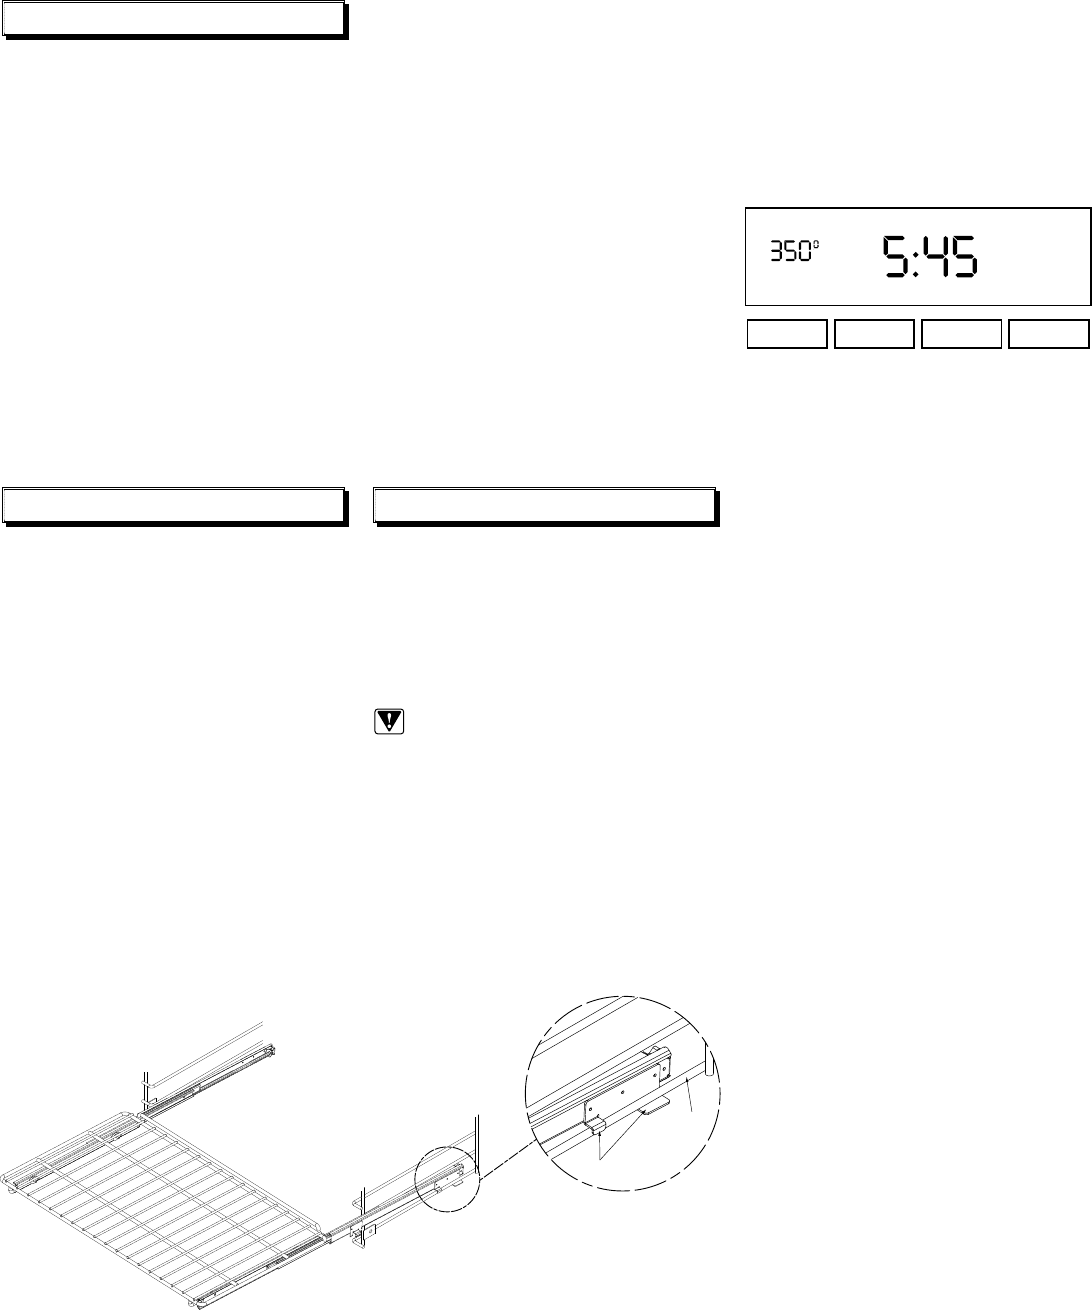
Oven GlideRack™
Dacor’s Oven GlideRack™ is designed to
install effortlessly and glide at a full extension.
Especially when using Dacor’s pizza stone
(model number ABS20), the full extension of the
rack allows you to slide the pizza on and off the
stone with great ease. It is also great for large
roasts in large roasting pans. This easy- slide
rack will allow you to baste more easily and
check temperatures of the food more safely and
quickly.
Proper Installation of the Easy slide Oven
Rack:
1. Fully extend the two side guides. Align two
small clips on the bottom at the rear of the
Oven GlideRack™ with the black porcelain
rack guides in the oven.
2. Begin to slide the rack in, then lift up. The
Oven GlideRack™ must be in between the
two clips on the upper and lower side of
the rack rear.
3. Push the rack all the way to the back.
4. Grasp the rack in the front center and pull.
The rack should come forward while the
side guides remain in place.
Helpful Hints When Using Your Oven
GlideRack™:
1. This rack works particularly well with
heavier items, although you can use it
during any baking, broiling or roasting in
your Dacor oven.
2. These racks will need to be spaced out
when using more than one in the oven at
a time. For instance, the racks should be
used on rack positions 1,3, & 5 or 2 & 4,
counting up from the bottom, instead of
using racks 2,3, & 4.
3. When using the rack with Dacor’s ABS20
baking stone, use rack position 1 for best
results.
4. Heavier roasting pans and dishes will also
cook better on Rack position 1.
5. Do not leave the rack in during self- clean.
The rack will become difficult to slide in
and out if it is self- cleaned. Remove all the
racks and the filter in the back of the oven
before self- cleaning..
6. To clean the rack, use hot, soapy water
and the rough side of a sponge.
Glide clips
Oven
rack
2. If cooking will not begin immediately,
place only very cold or frozen food into
the oven. Most unfrozen foods should
never stand in the oven for more than
two hours before cooking begins.
3. Do not allow foods to remain in
the oven more than one hour after
completion of the cooking cycle. When
the temperature drops below 140˚F,
bacteria can develop.
Oven GlideRack™