


2.1.1. Opening the Refrigerating System for Repairs
with Recovery of Refrigerant.
If a hermetic refrigerating system is to function correctly and
have a reasonably long life, it is essential that the amount of
impurities pre-sent in the system, i.e. moisture, foreign gases,
dirt, etc., be kept at a minimum.
This fact must be taken into consideration when repairs are to
be made, and the necessary precautions must be taken.
Before commencing repairs, make sure that all other possible
faults have been eliminated and that an exact diagnosis of the
problem has been made.
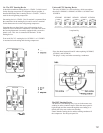
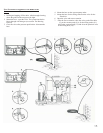
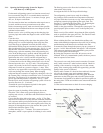
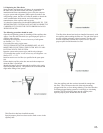
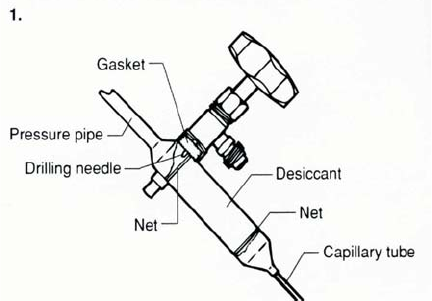
Mount a service valve or drilling tongs on the charging pipe
(process pipe) and confirm the diagnosis with a suction mano-
meter.
Close the valve.
After thorough cleaning of the spot where the gasket of the
drilling tongs is to seal and adjusting of the tongs into filter
size(if the tongs are tightened too much, the filter will be
deformed the drilling tongs are mounted on the top of the filter
drier just below the curve (at the pressure pipe - see fig. 1.) and
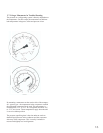
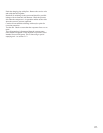
drill the filter. Mount the hose on the threaded branch of the
drilling tongs. After the mounting of the refrigerant bag, the
valve on the drilling tongs is opened, and the refrigerant will
pressurequalize into the refrigerant bag. After the pressure
equalization the valve is closed, and the refrigerant bag is
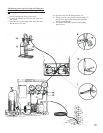
dismounted and mounted on the vacuum pump outlet - see fig.
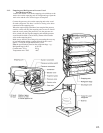
4. Connect the hose for the filling station on the valve for the
filter and open the valve - see fig. 5 and 6. The refrigerating
system is now ready for the first evacuation with recovery of
refrigerant. Evacuate to a pressure of approx. 1 mbar. There
must not be any appreciable overpressure in the refrigerant bag,
as this may damage the vacuum pump. When changing
refrigerant bag the evacuation is stopped by closing the valve for
the vacuum pump. After the evacuation the valve is closed at the
filter drier. Dry nitrogen (N) is connected to the valve on the
process pipe and the pressure is equalized - see fig. 7 and 8.
Plan the repair work so that the refrigerating system will not be
open for more than 10 - 15 minutes.
Assemble the special equipment required for the repairs.
Assemble any spare parts required.
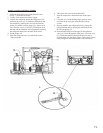
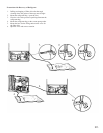
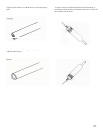
Open the system by breaking off the capillary tube at the
filter drier. This is done using special-purpose pliers or
capillary tube scissors, so that burrs and deformation of the tube
are avoided.
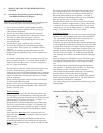
Cut out the filter drier with a pipe cutter - see fig. 9. The filter
must never be soldered off, as any moisture collected in thefilter
will evaporate and be pressed back into the system,where it can
later lead to the formation of ice in the capillary tube. Blow dry
nitrogen (N) through the process pipe and into the system. The
inlet pressure should be approx. 5 bar.
Continue blowing for 1 - 2 minutes. This creates an inactive
atmosphere, which is a pre-requisite if soldering is to be carried
out.
The blowing process also allows the localization of any
obstructions in the piping.
Investigate the filter as well for possible blockage.
The refrigerating system is now ready for soldering.
Any leakages can be remedied and components remounted.
All pipes which have been cut over (eg. when replacing the
compressor) must be plugged during the repair work. See
Sections 2.2.: Replacing the Filter Drier, 2.3.: Replacing the
Compressor and 2.4.: Replacing the Evaporator.
Solder on the pipes and blow 2 through the system again. Use
special-purpose pliers to make a wave in the capillary tube
(2.2.).
Mount a service filter which is larger than the filter originally
used (as specified in the spare parts list). The filter drier must
be hermetically sealed until it is mounted.
When soldering the filter, note that the thin capillary tube
cannot with-stand high temperatures due to the risk of melting
and that heating must therefore be confined to the filter.
Evacuate the system through the process pipe to a pressure of
ap-prox. 1 mbar. Rinse thereafter with approx. 309 refrigerant.
This causes any moisture or non-condensable gases present
to be mixed together and discharged.
By letting the compressor run warm, this process can be
furthered. With very contaminated systems, the above process
must be repeated several times.
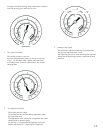
The system is now ready for the actual evacuation. Evacuate
until a stable vacuum of 1 mbar has been reached. Check for
stability of the vacuum by closing the valve for the vacuum
pump. If the vacuum gauge needle falls appreciably, possible
leakage in the system is indicated.
When a stable vacuum of 1 mbar has been achieved, close the
valve for the vacuum gauge and commence charging.
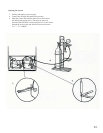
Switch on the heating element for the filling glass. Read the
manometer on the filling glass and select the column height.
The amount of refrigerant to be added is specified in grams on
the rating plate. Fill the unit with the exact amount and start the
compressor.
Use the suction manometer to check for correct charging.
Mounting of Drilling Tongs on Filter Drier.
20.