


Page 9
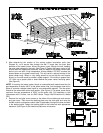
Figure 9
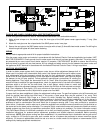
Figure 10
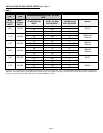
REPLACEMENT PARTS
Should the motor or blower wheel need replacing, the following replacement items are available. The Repair Motor
Assembly contains the Motor and Blower Wheel factory assemble to a mounting bracket.
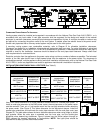
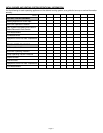
PART NUMBERS
MODEL REPAIR MOTOR ASSEMBLY BLOWER WHEEL
SWG-3 46196601 46131800
SWG/SWGII-4HD
SWG-4s
46234800 46310400
SWG/SWGII-5
SWG-5s
46234900 46213800
SWG/SWGII-6
SWG-6s
46235000 46385800
SWG-7 46152401 46154700
SWG-8 46460101 46154800
REMOVAL AND INSTALLATION OF THE SWG SERIES POWER VENTER MOTOR ASSEMBLY
REMOVAL
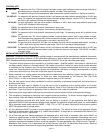
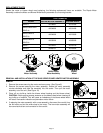
1. Remove the screws securing the motor enclosure cover. (See Figure 9)
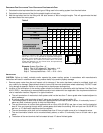
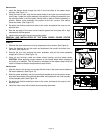
2. Remove the screws securing the motor assembly. Rotate the motor assembly
counter-clockwise and slide the assembly into the center. Then pull the motor
assembly out of the unit. (See Figure 10)
3. Clean off any build-up inside the blower wheel housing and the blower wheel.
CAUTION: Avoid applying excess pressure on the blower wheel when cleaning off
any build-up of material. This will cause an imbalance of the blower wheel which
will result in excessive vibration and premature motor failure.
4. If replacing the motor assembly with a new assembly, disconnect the conduit from
the old motor and cut the wires close to the motor. The new motor assembly will
have an electrical box and connector for the conduit.
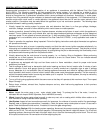
SWG Repair
Motor Assembly
SWGII Repair
Motor Assembly
Blower
Wheel