


11
Installation instructions
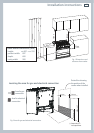
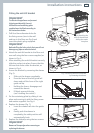
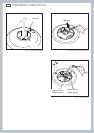
Dotted line showing the position
of the cooker when installed
Rear left
foot of cooker
Anti-tilt
bracket
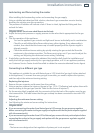
Fitting the anti-tilt bracket
Important!
To restrain the appliance and prevent
it tipping accidentally, the anti-
tilt bracket and restraining plate
supplied must be fitted according to
the instructions below.
1
Drill four 8mm diameter holes for
the fixing screws (two in the wall
and two in the floor-see Fig.4) and
insert the plastic plugs supplied.
Important!
Before drilling the holes, check that you will not
damage any pipes or electrical wires.
2
Attach the anti-tilt bracket to the floor and
rear wall using the four screws supplied, as
shown in Fig. 4.
3
After attaching the anti-tilt bracket securely,
slide the cooker into place. Ensure that the
left rear foot slides under the bracket, as
shown in Fig.4.
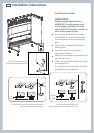
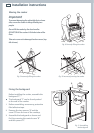
4
Access the bracket by removing the drawer
(Fig. 5):
a
Slide out the drawer completely.
b
Press the lever of the left guide rail
down and pull the lever of the right
guide rail up.
c
Holding the levers, disengage and
remove the drawer.
d
If fitted, remove kickstrip
(see ‘Levelling the cooker’)
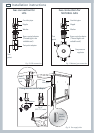
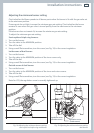
5
Fix the restraining plate by sliding it into
place and securing it with the fixing screw
and washer supplied. See Fig. 6.
6
Replace the drawer (Fig. 7):
a
Insert the drawer rails into the guide
rails.
b
Gently push the drawer in
completely; the safety catches will
automatically hook.
7
Replace the kickstrip using the two screws.
Important!
Beware of sharp edges when removing or
replacing the drawer.
Fig. 4 Attaching the
anti-tilt bracket and
sliding the cooker
into place
Fig. 5 Accessing the anti-tilt bracket
by removing the drawer
Fig. 7 Replacing the drawer
Fig. 6 Fixing the restraining plate
Restraining plate
Screw & Washer