1-20
Leakage
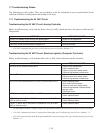
When a frypot appears to be leaking, suspect the areas where high-limit thermostats, temperature probes,
and drain ttings attach to the frypot. When installed or replaced, seal each of these components with
Loctite PST56765 sealant or equivalent to prevent leakage.
If oil coats the sides or ends of the frypot, the most likely cause is spillage over the top of the frypot.
There may also be oil pooled on the oor below the fryer. This is not necessarily a sign that the frypot
is leaking.
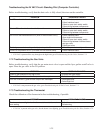
It is important to check the joints between round drain sections and all of the ttings. If removing a section
of drain tube connected to the drain valve for any reason, make sure that the O-rings are in good condition
and properly tted within the drain during reinstallation. Ensure that the clamps are tight and that the
nut holding them onto the stud of the tube is not stripped or loose. Also, check that the drain tube runs
downward from the drain along its whole length and has no low points where oil may accumulate.
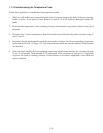
In very rare cases, a leak may develop along one of the welded edges of the frypot. When this type of leak
is suspected, thoroughly inspect the frypot. If it is denitely leaking, replace the frypot.
Basket Lift Malfunction
Performance Pro series gas fryers may be optionally equipped with automatic basket lifts to ensure uniform
cooking time. The lifts can be controlled manually or through a basket lift timer or Computer Magic
computer. Basket lifts will always come in pairs, although each operates independently.
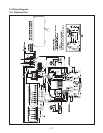
Each basket lift consists of a basket lift arm attached to a toothed rod, a reversible-drive gear motor, and
a pair of roller-activated microswitches. The gear motor engages the teeth on the rod and moves it up or
down based on the motor’s rotation. Microswitches at the upper and lower limits of movement stop the
motor when the basket is fully up or down. They also reverse the direction of current ow to reverse the
motor direction. When the manually set or programmed cooking time has elapsed, the basket lift receives
current and raises the basket out of the oil.
In units congured for manual (push-button) controls, a mechanical or electrical timer controls voltage
to the system. Turning a rotary knob sets the cook time, and pressing the button in the middle of the knob
activates the motor. When the timer times down, power is supplied to the opposite pole of the motor
through the upper microswitch. The motor drives the rod upward until it loses contact with the upper
microswitch, cutting power to the motor and stopping the lift.
In units congured for basket lift timers or Computer Magic computers, the process is almost identical.
The difference is that the push button mechanical timer is replaced with timing circuitry in the computer
or controller. The operator programs the specic cook times (and other settings) into the computer or
controller. When the product button is pressed, the timing circuitry activates a coil in the basket lift relay
to supply power to the lower microswitch. As with the manually controlled units, the microswitches stop
the motor at the lift’s upper and lower travel limits and reverse the direction of current ow, reversing the
motor’s direction.
There are three basket lift problem types. They are
• binds and jams,
• motor and gear wear, and
• electronics failure.


