1-4
6. Take a pyrometer reading when the burners go off for the third time.
7. Loosen the setscrews in the thermostat knob and turn knob to the temperature established by the
pyrometer reading.
8. Allow burners to cycle on and off three more times and recheck pyrometer reading against
thermostat setting. Temperature readings should be within 5°F (2°C).
On G-Model Fryers
1. Fill the frypot to the lower OIL-LEVEL line with cooking oil. If solid shortening is used, it must
be tightly packed into the frypot.
2. Light the pilot. (Refer to Chapter 3 of the Installation and Operation Manual, P/N 819-5776, for
detailed lighting instructions.)
3. Insert a good grade thermometer or pyrometer into the frypot, about one inch from the
thermostat.
4. Set the thermostat to 325°F (162°C).
5. Allow the burners to cycle on and off three times. Compare the reading of the pyrometer to the
setting on the thermostat plate. The position of the knob on the thermostat and the reading from
the pyrometer should be within 5°F (2°C) of each other.
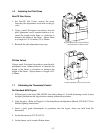
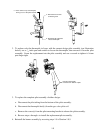
6. If not, loosen the setscrew and stop screw securing the thermostat shaft extension to the flexible
shaft. Remove the extension to expose the slot in the end of the flexible shaft. Use a flatblade
screwdriver to adjust the thermostat.
7. When the cooking oil temperature reaches 325ºF (162ºC), turn the flexible shaft slowly clock-
wise until the burner shuts off. (Turning the shaft counterclockwise causes the burner to light;
turning it clockwise causes it to shut off.)
8. Allow the fryer to sit for a few minutes, then slowly turn the flexible shaft counterclockwise
until the burner lights.
9. Repeat steps 6 and 7 at least three times to ensure an accurate setting is obtained. The thermostat
control is considered to be properly calibrated if the burner lights as the cooking oil cools to
325ºF (162ºC)—not when the burner shuts off as the temperature rises.
10. Once the calibration point of 325ºF (162ºC) is determined, allow the burner to cycle on and off at
least three times to be sure it will light at the calibrated temperature.
11. Carefully replace the thermostat shaft extension, ensuring that the stop screw is pointed straight
up. Tighten the stop screw and locking nut and the setscrew, being careful not to rotate the
flexible shaft.
CAUTION
The thermostat flexible shaft must not be rotated while installing the thermostat
shaft extension.


