


6-8
4. Remove the four screws from the blower stabilizing bracket attached to the blower assembly and
to each burner. Remove the stabilizing bracket from the unit.
5. Remove the screw securing the blower support bracket to the cookpot assembly and lower the
blower assembly out of the way. It is not necessary to disconnect the blower wiring.
6. Remove the two screws at the front of the burner assembly to be replaced, then pull the assembly
toward the front of the unit slightly to free it from its rear support. Remove the assembly
through the bottom of the unit.
7. Reverse steps 1-6 to install replacement burner assembly, being careful to get the insulation strip
running along the top of the blower support bracket back in place.
6.6.9 Replacing the Cookpot
1. Remove the cookpot insert.
2. Remove the top cap by removing the two screws on the front and the screw on each end.
3. Remove the flue cap and lid assembly by removing the two screws on each side and the two out-
ermost screws on the back. Rotate the bottom of the flue cap forward slightly to allow the top of
the flue cap to slip out from under the back panel.
4. Remove the four screws securing the upper flue assembly to the back panel.
5. Remove the blower motor by removing the four nuts securing it to blower mounting bracket.
6. Disconnect the flexible gas lines, gas enrichment tubes, ignitor wires, and flame sensor wires
from the burner assemblies.
7. Remove the temperature probe from the cookpot. Leave wires attached.
8. Disconnect the water fill line at the cookpot and at the solenoid valve inlet.
9. Disconnect the wires from the water level sensors, marking them to facilitate reconnection.
10. Lift the cookpot assembly out of the cabinet and set it, top down, on a suitable work surface.
11. Remove all other hardware from the old cookpot and install the components on the replacement
cookpot, using Loctite
®
PST56765 on the drain valve threads. (NOTE: Install any replacement
insulation that might be required before installing components.)
12. Reverse steps 1-10 to install the replacement cookpot.
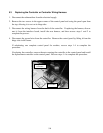
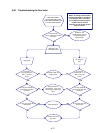
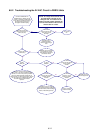
6.7 Troubleshooting and Problem Isolation
Because it is not feasible to attempt to include in this manual every conceivable problem or trouble
condition that might be encountered, this section is intended to provide technicians with a general